What figures are those?

“Who makes that miniature? I want one!” Most of us who game have heard that countless times and we reply “oh so & so miniatures out of England” or “such and such minis in New Jersey”. Some of us answer this way “I did” because we either did the figure from scratch or modified an existing figure.
Compared to 30 years ago when I started gaming the selection of figures, terrain, and miniature accessories has grown to a point where even some of the most obscure armies and periods are easily found and, in several scales, things we before only imagined are now found with just a few mouse clicks! For most people this is great, wonderful, but there are still quite a few of us who like the scratch building and customizing side of the hobby and that many times creates the problem that now commercially produced item do not fit the bill. When this is the case, for me out comes the saws, drills, sculpy, kneadite, green stuff, x-acto knives, and all the different materials and tools the scratch builder uses to bring his imagination to the table.
I thought for this post I would just toss up a few of my recent conversions.

These are 28mm “Old Glory” figures from one of their American Civil War packs. My buddy Steve has been painting a US force for use in battles from around 1880 to 1910 (Spanish American War to the Boxer Rebellion) and wanted some artillery limbers for them. He found some ACW limbers that would work but the figures all wore the Kepi style hat that would be wrong for the period. I took up the challenge to modify them with new headgear.

They came out better that I expected and only took about 15 minutes each to do.

On the right figure with “Kepi” style hat still in place. On the left, Kepi cut off and sculpted replacement.

The “Western” style wide brimmed hat was very popular with the troops in the sunny hot climates.

I think the hat conversion gives them the feel and look of a late US artillery crew.

Figures for a friend, Swedish Warband 1650

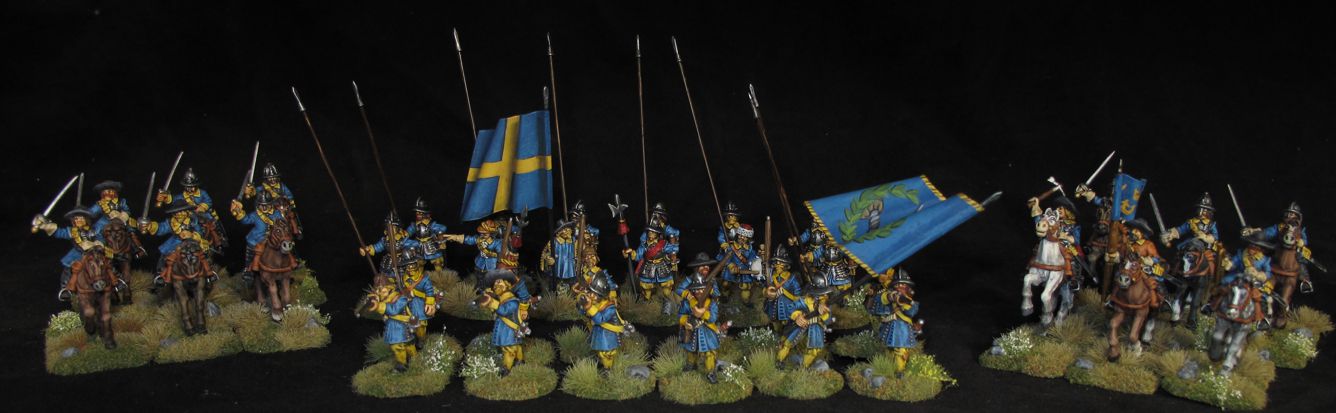
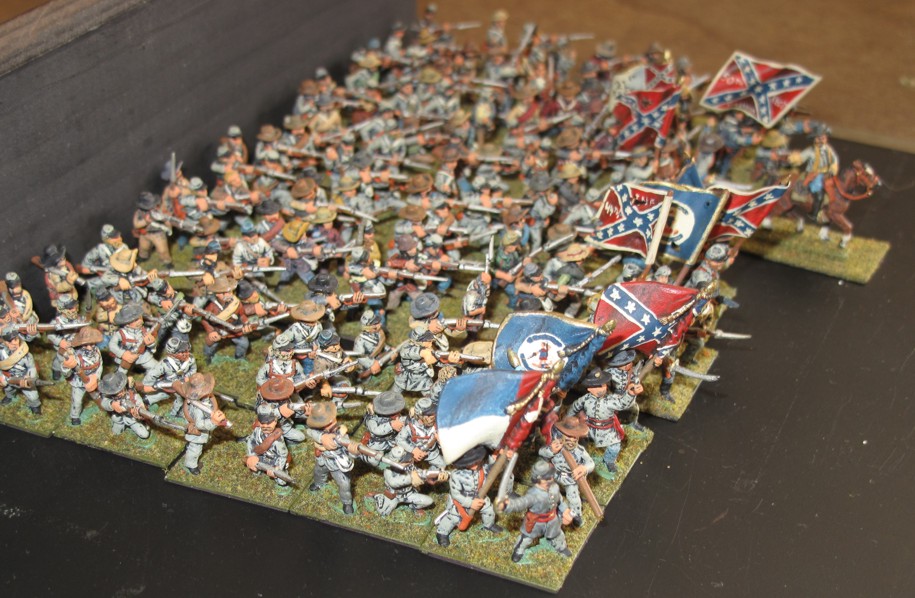
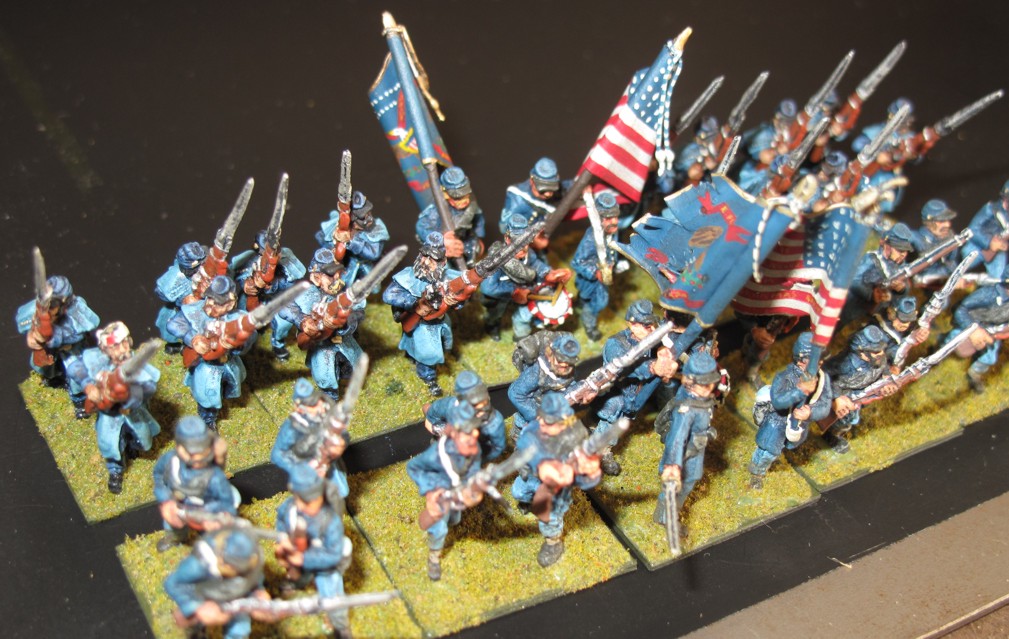
Ready to defend Swedish soil or perhaps add a little! I think they have a very distinctive look easily recognized on they battlefield.

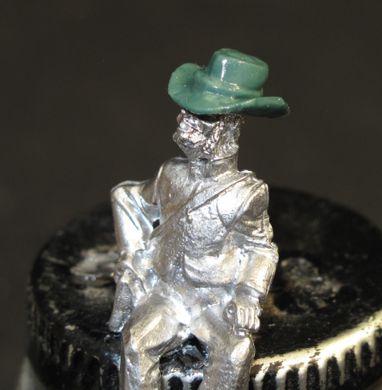
I rarely paint for hire, then if I do its for a friend who wants “Something special” and when one of the “Dogs of War” gaming buddies Frank asked several times to think about painting his Swedish Warband for use with the “Donnybrook” rules system I hesitated to do it. I looked at the figures from the “Assault Group”, 24 infantry, 12 cavalry he had already purchased, they were very nice, well-proportioned and sculpted. These were no “old Glory” figures, these would paint up well but would show any mistake or lack of care. In other words, they would look great if painted well, short cuts would show with these unlike “rougher sculpted” figure types. I decided that the cash generated from the commission would slide me into my 28mm Samurai Warband figures from the Perry’s nicely, so I agreed.

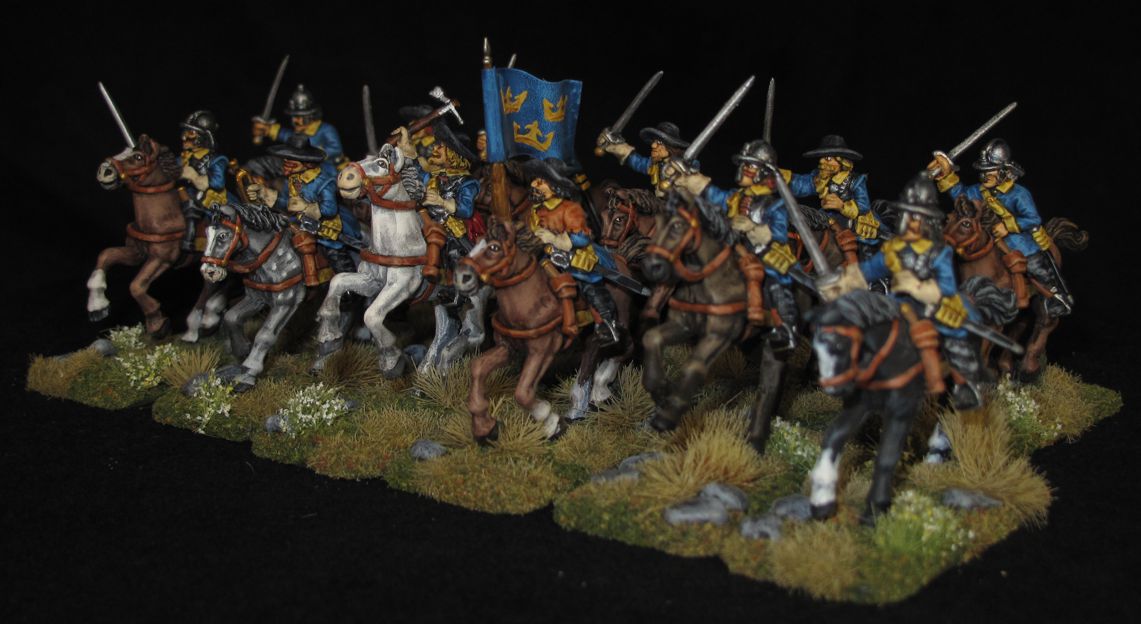
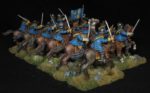
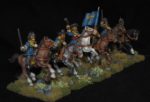
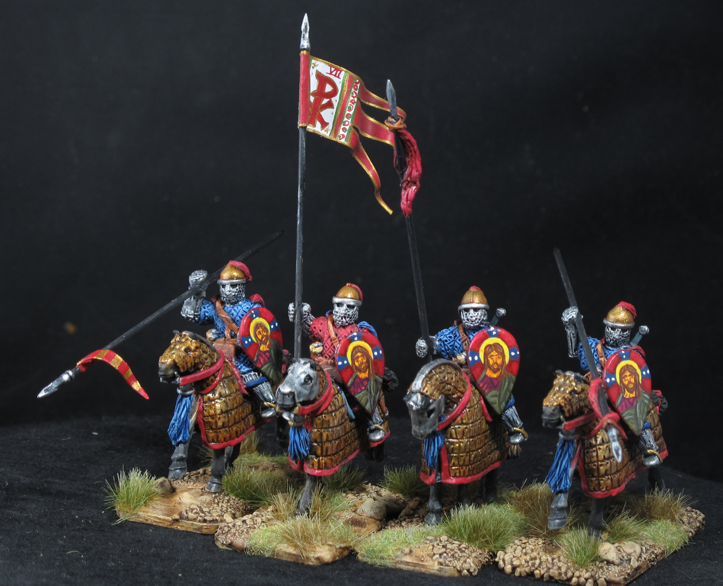
For a long time I have dreaded painting horses, tough to make look “alive”, I think over the years I have developed a style and method that accomplishes this and is almost “fun” for me to do!

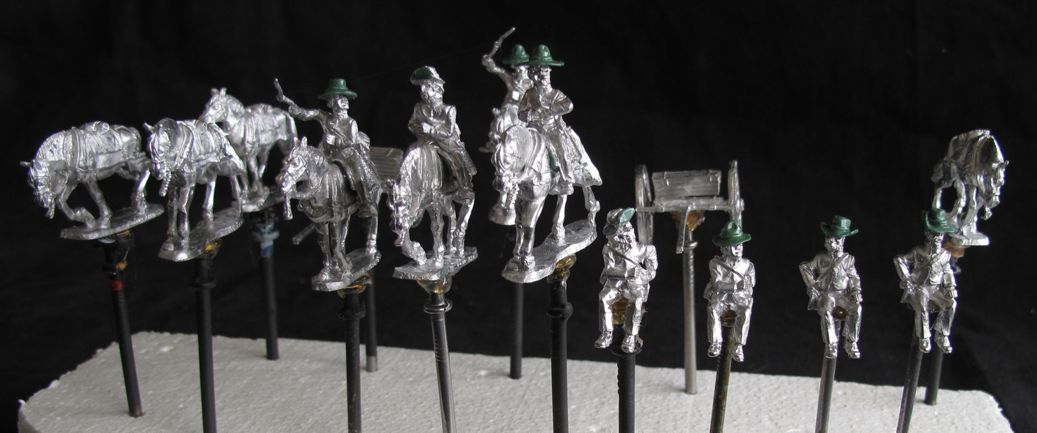
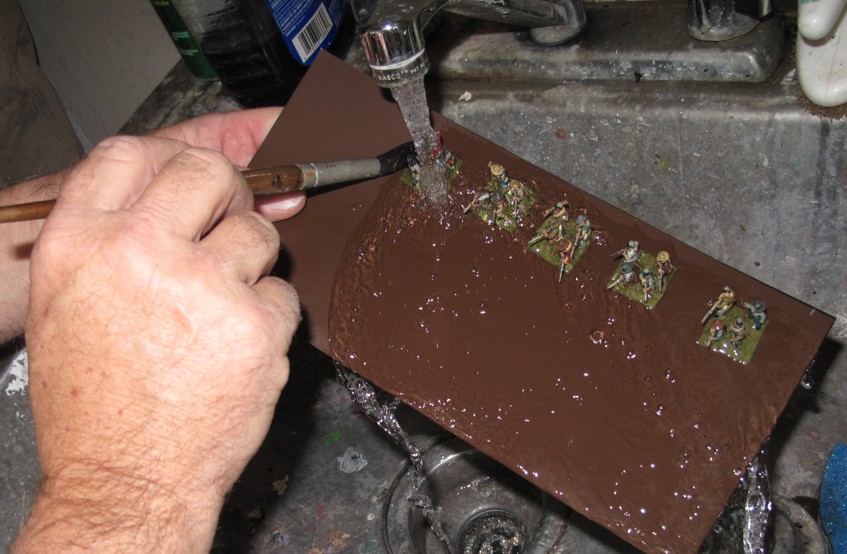
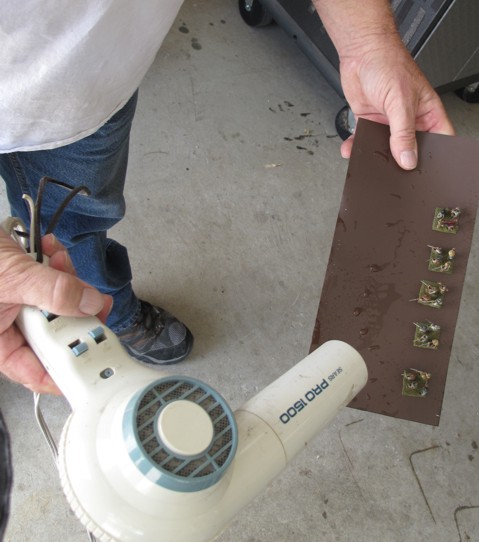
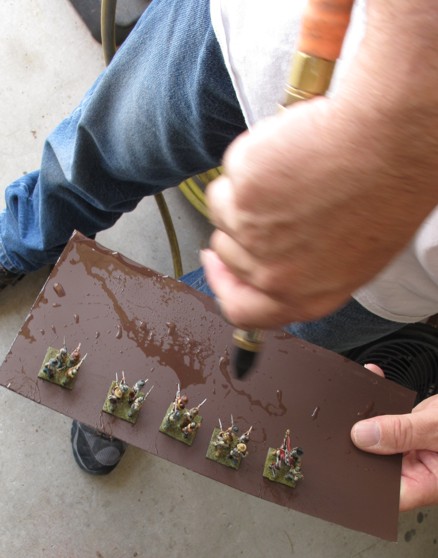
There was also going to be quite a bit of custom work involved, hand made pikes, pose alterations, and custom flags to be made. I also do very custom bases on my figures and when I paint for others it’s a complete “head to toe” job, flag tip down to magnetic base. I don’t want a great looking figures sitting on a so-so base! I take quite a bit of time on figure prep and finish since I think the majority of figure painters and especially sellers don’t! I have seen quite a few mini’s in my day and lots of friends have purchased figures to flush out their collections. The vast majority of these figures are not prepped properly or coated and sealed after painting resulting in wear marks from handling, spears, swords, and other pieces breaking off, and the flocking and basing looking old and worn very quickly. Cheap figures ALWAYS have a short cut involved, that’s why their CHEAP. A good automotive primer sprayed on and left to dry for 24 hours is best. Sealing with at least two coats of GLOSS COAT is a must, DULL COAT is NO protection! Let the Gloss coat dry for 12 hours, less depending on weather (dry and hot out) or speed it up GENTLY with a warm blow dryer! My figures and much of my terrain has been done this way and you can take my stuff to the sink and gently was off dust with cool water and a soft brush! If need be.

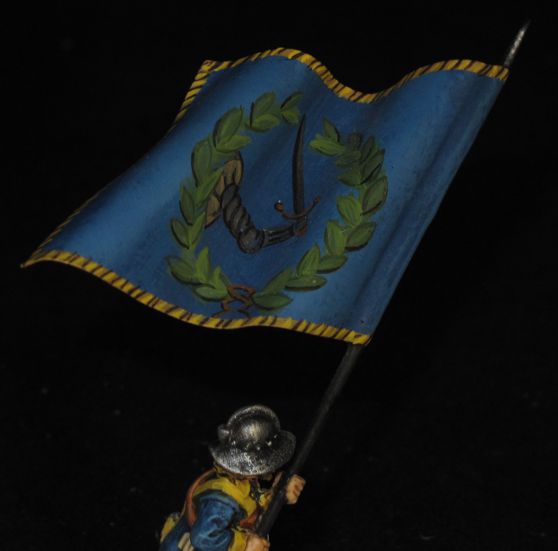
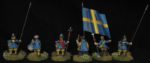
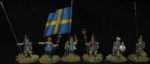
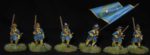
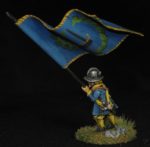
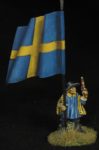
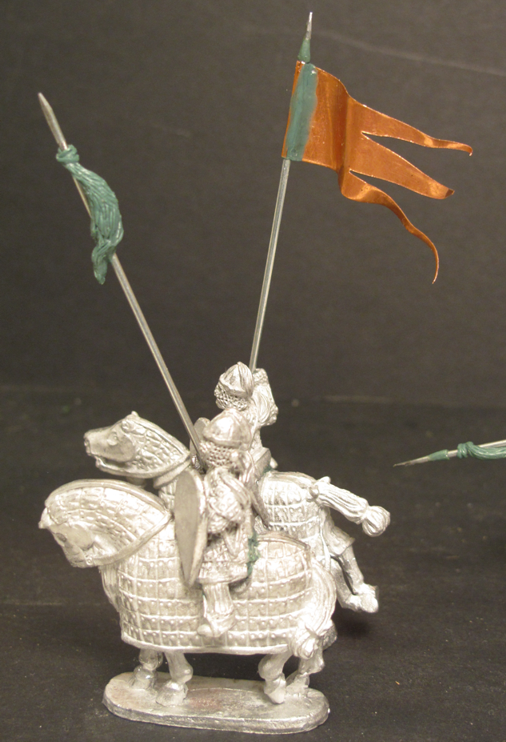
I make my own flags, copper sheet, and handpaint them, I think for better or worse its now a completely “painted” figure.

The job was tough but it was also fun! It was a period I had not painted and the color scheme included lots of yellow, a color that is always tough to paint. Below is a short run down of what was done. The pictures will speak for themselves as to how successful I was…enjoy!

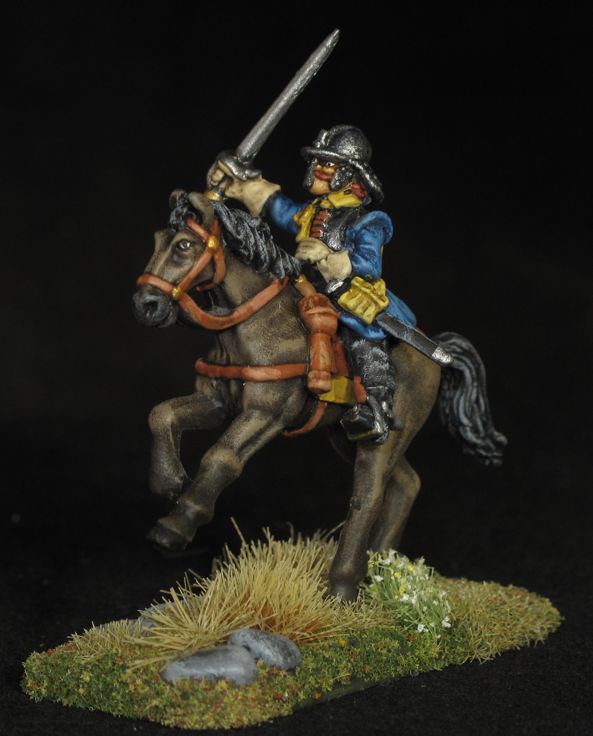
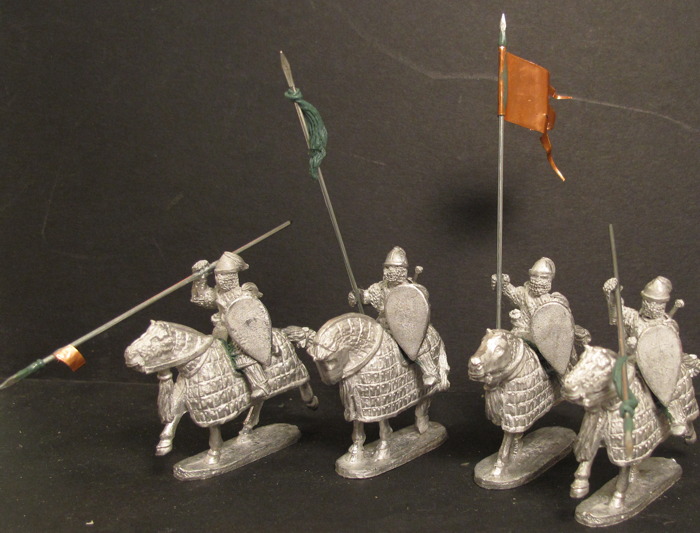
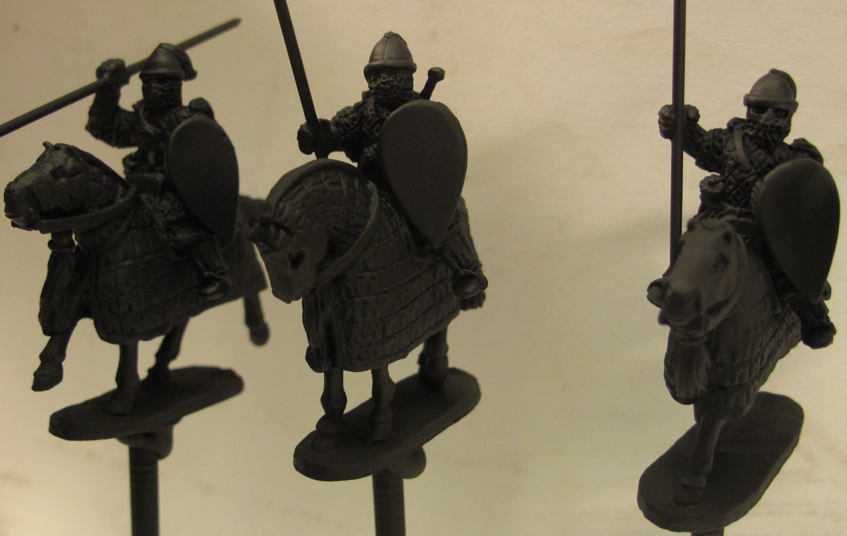
A little cutting and filling can make horse’s look quite different from one another and add a dynamic feeling.

I played a game of “Donnybrook” at the “Dog Pound” Saturday and enjoyed it! Not sure if I’ll bite, jury is still out as I’m not a fan of card driven activation where you can have a player sit around doing nothing for most of the game, as well as units unable to react to clear threats for to long a period. The use of so many different dice to preform actions and the fact they change as a unit takes damage is a bit confusing and I think could have been handled differently. I will play again since I have Moors that can be used, perhaps Frank won’t want his Swedish, and it’s really about getting together with friends, kibitzing, and just having fun!

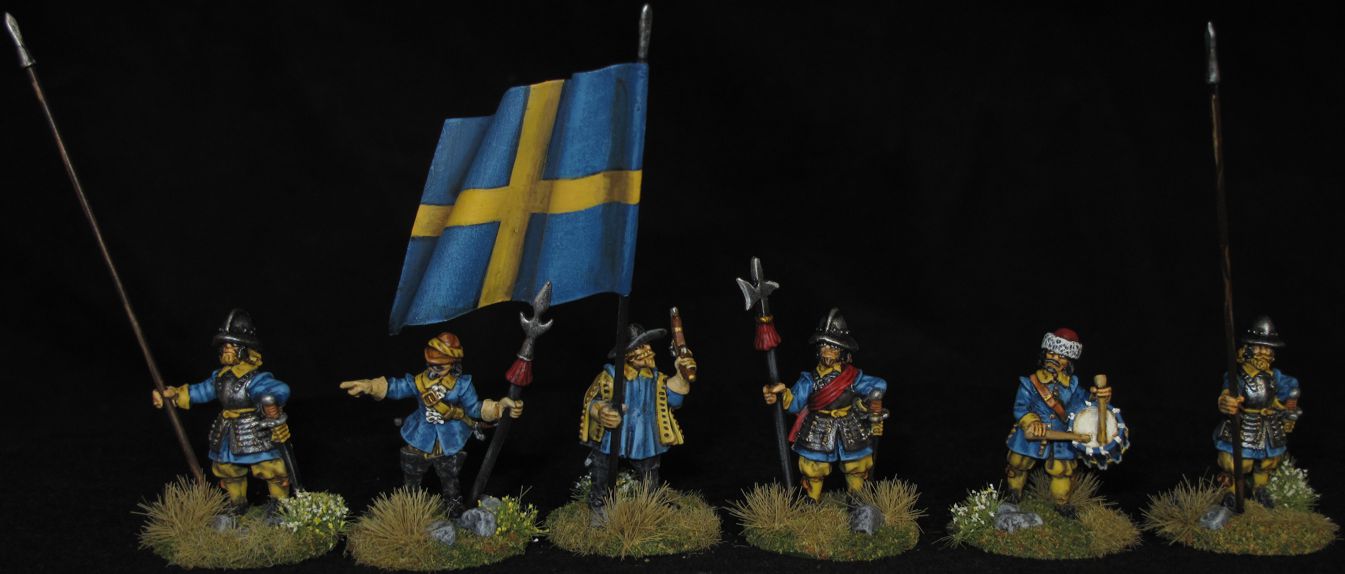
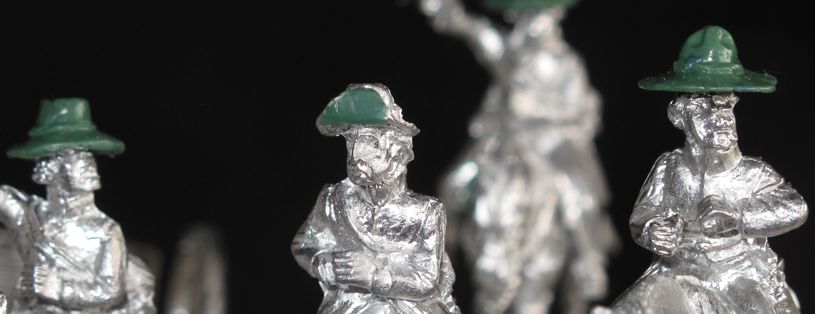
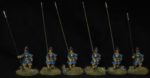
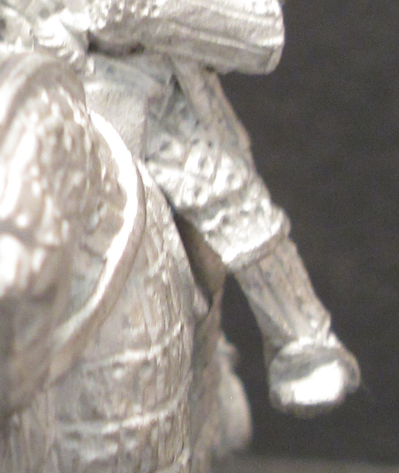
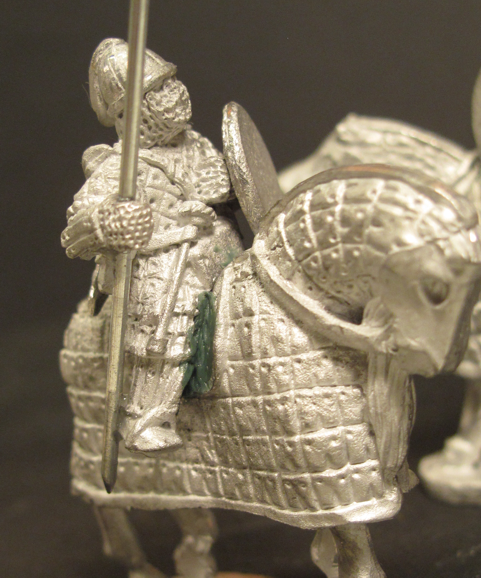
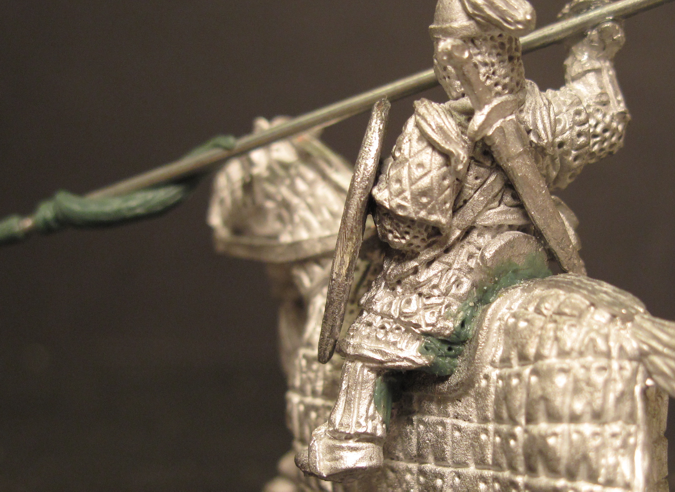
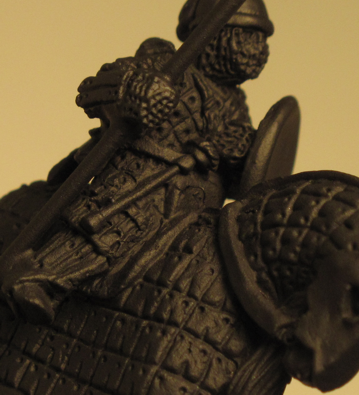
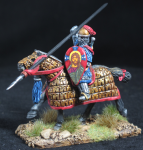
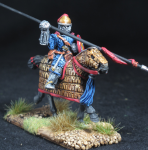
The command group from the Pike-man unit. These are really nicely sculpted and have great poses! Click and enlarge the picture we reveal the pike tip work done with kneadite “green stuff”

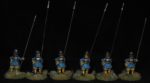
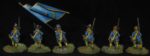
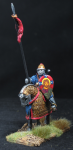
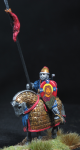
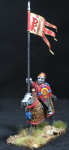
Swedish Warband 1630,

(36 x 28mm Figures, 24 infantry plus 12 cavalry)

Clean and prep. (mold lines and flash removed, figures washed, hands drilled)

Figure modifying and assembly. (Including handmade pikes & horse positioning)

Handmade flags and poles. (custom copper flags and steel poles.)

Prime with high quality automotive primer. (Krylon ulta flat black)

Painting to a Collector Standard. (Blending, highlighting, washes, aging, ect..)

Hand painted flags. (3 separate designs attributed to “The Blue Regiment”)

Figure sealing. (two coat of Testors gloss coat on figures, One coat gloss to seal base material, One coat dull coat to entire finished figure and base)

Mounting (3mm Litko plywood + .30mm magnets, custom 45 degree base clipping)

Base treatment. (filler putty, rocks, paint. Two color flock, Static grass, Tufting and flowers) The entire base is gloss coat sealed and the figure can be lightly washed, softly and quickly in cold water if needed to remove future dust.


“Escort Service” part 2

These will make a great unit for the “Escort” scenario in SAGA

So for Part 2 of my “Escort Service” I finished up my pig herder and his swine. I also based these guys for ease of movement but tossed in a bit of a twist in that I did it like a movement tray. I did this because I wanted the ability to use these figure singly in other situations.

To make the base I used some sheet polystyrene the same thickness as my “LITKO” bases used for SAGA infantry, about 1/8 inch. I arranged the figures to my liking and then traced onto the polystyrene the area that would be the base. The base was cutout using a hobbyist sized band saw from Micro Mart.

This is a great tool to have in anyone’s tool arsenal! If you do not have one a “cooping” saw will do the job as well, well almost as well! The cut was done with a sloping angle edge to make it blend better with the terrain.


Next a sheet of thin magnetic sheet stock was cut in the same shape. This will later be contact cemented to the styrene base to both hold it to the storage drawer’s metal lining and help hold the figures in because of their magnetic bases.

I arranged the figures on the base again and this time traced their out lines onto the styrene in preparation for cutting the holes the figure will sit into later. My figure bases are round and 1 inch or 25mm. I used a 1 ¼”  “Fostner” bit in my drill press to cut the holes. A “Fostner” bit cuts perfect round holes not possible with a regular drill bit. Not cheap but you will only ever need one and used for cutting plastic will last your lifetime!


Once the holes are cut the pieces are assembled using contact cement and with a bit of finish sanding is ready for finish decoration. I use a recipe of Durham’s “Rock Hard” as a base material in landscaping and in 20 years found no problems. Mix it 80% with 15% white wood glue and 5% water. Just experiment with this formula until you get it right. It should be the consistency of porridge, easily spread on and a bit flowing. As it dries u can push it around for a natural unevenness. The glue is important since without it the “Durham’s” may chip or flake with table use.

Even though the individual figures are removable with a little effort you can make it blend very well and hardly noticeable in the base.

Once again I get wrapped up in the building and forget the pictures but I think you get the idea and feel free to ask question in the comments. I think it came out great and this now finishes 2/3rds or the “Escort Project” so see you soon for the last installment!


Byzantine Birthday Build

My main gaming buddy Steve Gausche had a Birthday approaching and being a guy with everything I had to figure out a gift he wanted, he needed, and something he couldn’t get anywhere else….? Easy! A Byzantine Cataphract! Steve had SAGA Byzantine Warband painted by “Monty” he purchased about a year ago, but it had not come with the very cool fully armored heavy horse cavalry used by the Byzantine Emperor Belasarious! Steve had mentioned several times he might pick up and paint some of these. Knowing Steve I sensed this would not happen soon if ever!

BYZ7So with a couple of clicks on Gripping Beast website a 4 figure unit of 28mm BZC06 Byzantine Kataphractoi were winging their way across the sea to me and my waiting paintbrushes. Within a week they were sitting on my “workbench” going through the pre-paint process. That’s where I trim flash, alter poses, and fix any casting problems a well as make custom changes to the figures. I like to have figures that are unique and a bit better than a just painted of the shelf figure set.

BYZ1BYZ2

One of the first problems I found in the casting was that the riders did not fit very well on the horses, they fit but if simply glued in place there would be huge apparent gaps between horse and rider. I’m somewhat of a perfectionist in my figure work and known for taking time with details that most of the time only I would notice….oh well that’s me!

BYZ6I knew that the gap was way to big for simple filling with glue. Even milliput of other filler would not look right. I decided to use kneadite, blue / yellow, the 2 part sculpting epoxy (used for sculpting figures from scratch) and sculpt the missing space to look like the rest of the figure. This would mostly be some padding and chain armor around the figures legs.

Besides the filling around the legs I would do scratch built steel spears, spear points, copper flags, and a few other additions. I was planning on just using decals for the shields but as usual I was not happy with that and painted the shields by hand. BYZ4BYZ3

The Byzantines Kataphractoi Cavalry used “Kontos” a very, very long spear (some estimate it at around 21’) and I wanted that to be represented on these figures if I could. The only problem with that was that a true scale 21’ spear would create problems with storage as well as their use on the battlefield. I chose to use a spear length of about 15 scale feet as it gave a good “long” look and still worked reasonably well for storage in my case.

To the spear I added some flags and pennants. I sculpted some horse tail pennants as well just to give variety. I was not sure about the job at first but later pictures show it came out great, in fact I sometimes forget it was not part of the factory “sculpt”.

BYZ5On to the prime coat and as with most of my “metal” mini’s I used “Krylon” auto primer flat black. This primer not only works great but is very inexpensive, about $5 a large can.

BYZ6p1

BYZ6p2

No more “gaps” after the additional sculpting/filling.

Well after this point I got into my painting mode and didn’t take another picture until they were based and painted! I think they came out quite nice. I went back and forth as to a shield design, at one point I was just going to decal them, but in the end I hand painted them BYZ9as I like to do. Its a lot more work but I think it then gives you a true hand painted figure. I’m not a real good painter (figures yes but portraits, no!) but I took a stab at painting the “Savior” on their shields as I thought that was very appropriate. This gives them the feel of “being Protected by their Faith!”


The “Kicker” of this who story of “Steve’s Birthday Figures” is that Steve was touched, happy, and impressed with the gift of the “Byzantine Cataphract” but let slip that he was thinking of selling the “warband” since he did not like playing them….Lol! So I guess I’ll just do a unit of Viking Archers for him as he will like them a whole lot more….. the Byzantine Cav?  Well I may sell them or I just might paint a Byzantine warband for myself!

Are your “Old Figures Washed up”

One of the first boxes I made over 20 years ago! Even in the cleanest conditions dust will accumulate over time!

One of the first boxes I made over 20 years ago! Even in the cleanest conditions dust will accumulate over time!

Over the years I’ve amassed a pretty large collection of miniatures. Recently I have been going through them and paring down periods and scales to stuff I’m really going to game with or at least build in my lifetime…. My buddy Steve and I used to be “Big” into American Civil War and built up large collections of 15mm figures for our then favorite rules Johnny Reb 2. Well over time you find other periods and scales and the figures find themselves on the shelf, disused for years.


Even in the case, and the case in a cabinet, dust manages to creep in over the years! The outline in dust shows were the first figures have been moved for washing.

Even in the case, and the case in a cabinet, dust manages to creep in over the years! The outline in dust shows were the first figures have been moved for washing.

Recently in going through my collections I took a look at my ACW collection, recalling all the fun times had playing with them I remarked to Steve “we should start playing these again” he agreed. I gave my figures another look over and noticed they just did not look as nice as I remembered them?Over the years a fine layer of dust had coated them, even stored in my custom cases dust had crept in. What to do? Well a bit of air and a soft brush might help but I have always found that it was tough to really clean them well that way as the brush misses a lot.

For almost as many years as I have painted and played minis I have pushed the boundaries of prepping and painting them. Long ago and before it was common or even popular I was priming with “automotive” primers to give the paint a secure “bond” to the metal, resin, or PLASTIC! Years ago I began gloss coating my figures before “Dull” coating to protect them from damage caused by dropping, pizza fingers, and normal wear during play.  I knew that since these figures were some of the first I had used that method on that it would be safe to WASH them!!! Yes wash them… put them under a “gentile” stream of room temperature water and brush them gently with a large, VERY soft, long bristle,  brush. I use either a cheap one from a craft store or better yet one of my wife’s “old” makeup brushes.

By having the water directly hitting the brush it will spread the bristles and push them into and across the figure.

By having the water directly hitting the brush it will spread the bristles and push them into and across the figure.

Gently drying, no het. I'm also blowing in an oppisite direction of gravity to help from blowing figures off to floor. this would be better done over a table with a soft clot below.

Gently drying, no het. I’m also blowing in an oppisite direction of gravity to help from blowing figures off to floor. this would be better done over a table with a soft clot below.

If you try this I recommend doing only a few figures at a time so you can monitor the effect of washing and if there is a problem stop before it affects your entire army. Gently work the brush around each figure as the water flows the dirt away.

You also will need to force dry your figures. Just letting them set and “air” dry is not recommended as you may get some “spotting” from the minerals in the tap water. I should mention at this point that ALL my figures use a magnetic basing system (some figures directly on magnets, some on metal, with either metal or magnet lined drawers). The magnet makes the process much easier since the figures will stick on the surface of the metal or magnet covered board I use to wash and dry them on. This keeps the water and air pressure from tumbling the figures off the board… If you have a distilled or water filter system on your sink use that.

Using air compressor (on low)

Using air compressor (on low)

So once you have washed your figures you need to dry them and you can do this several ways. I use air pressure (soft) just enough to blow water off and leave a clean dry figure. I have a air compressor in my shop with adjustable nozzle, but a small can of “Dust Off” (compressed air) or a hair dryer will work fine. If you use the hair dryer don’t use the “heat” just the cool air. Heat may damage the paint or basing material (some magnetic sheet material has a layer of plastic glued to it and heat may cause the glue to melt and the sheets to separate). You need to decide what works best for YOUR figures.


Those dusty Confederate figures cleaned and returned to their clean drawer. Its a bit hard to see the difference in web pictures but its very apparent in person. These figures need some re-flocking but I'm going to re-base them for "Fire and Fury" anyway.

Those dusty Confederate figures cleaned and returned to their clean drawer. Its a bit hard to see the difference in web pictures but its very apparent in person. These figures need some re-flocking but I’m going to re-base them for “Fire and Fury” anyway.

Another reason for “drying” the figures is that most of us are using regular PVA (wood glue) for applying our basing materials and this glue will break down when its wet to long. I get my figures fairly dry, no standing water on them and let them air dry the rest of the way. WARNING!!! all my basing is magnet, steel, plastic, or some combination of these “water” resistant materials, if you are using cardboard stock (dude it’s 2015 not 1972!) be careful as the water may/will damage your basing. I now gloss coat my basing materials after the figure is finished so its sealed along with the rest of the figure. (I’m sure my figures will last many generations beyond me!)

So trot out those old figures, wash them up, and give them a new lease on life!

Bill Witthans

Old Glory figures after their "bath"

Old Glory figures after their “bath”


The Building continues!

Set3

The “Homeowners association” in this Village is tough! Red Roofs only!

As a follow up post to the last one on the “Total Battle Miniatures” 10mm Buildings for the Napoleonic Wars in Europe I figured I would post pictures of all the buildings as I worked my way through painting them. Here are the next five I have done. In the “Total Battle” base system five buildings would be the number required to fill one of the “Village” bases and is a comfortable number to paint as a group, speeding things up as you can paint the same areas such as roof, walls wood, ect…at the same time. This set of five I did a bit different look for the roofs, using a red/orange color for the tiles and selected some of their buildings with a distinctive style “cap” to some of the roofs. This different roof treatment was treated as a “copper” sheet roof, not uncommon back then in Europe and other places. I gave it a weathered look to show copper as it looks after years of exposure to the elements. I also did a bit of house numbering as well and signage.

Set3dWhile these buildings are all painted with the same style and color palette they can easily be mixed into the other buildings as some towns had buildings that looked very different from one another. Painting this way however speeds up the process enormously and helps you to have a consistency when you want it.

Here's the whole set as ordered.

Here’s the whole set as ordered.

BasepaintWash

In the last post you saw this picture of the whole unpainted set. All the buildings need to be washed in warm/hot water with dish soap to remove any mold release. I was told no primer was need and a good acrylic craft paint would be fine. I used a combination of craft store paint with some Vallejo and washes.

Basepaint1I have several large old paint brushes picked up from garage sales and swap meets that I use for big projects. You want to make sure of complete coverage, push the brush in every nook and cranny.

Basepaint4 After a few base coats you can begin “texturing” in roads and details. This is a good look at the fluffy brush I use! Many people toss out brushes like this but they are perfect for big terrain projects.

All the bases done and detailed. I used no clear coat on them as I did not want any paint that might not take the slight bending of the base.

Basepaint5All of the Church buildings come with a couple of “dome” or “steeple” options and I was had pressed to select one so I decided to to make the different “steeple” options for the church’s secure yet ale to quickly be switched out. This involved a simple drilling enough space to insert a magnet in each piece and gluing flush. To do this you take a ruler and draw lines from on corner to the opposite corner giving you an “X”. Where the lines cross is exact center and where you dill your holes in the church steeple base and the “dome” top.

ChurchMagDo not drill the wholes any deeper than you need and be sure to check polarity of the magnets before gluing to keep their facings correct since one way they attract and the other they repel! When you glue in the magnets take special care to get them set in deep enough so that the dome sits flat or it will stick up looking silly. I was off on this one at first and you can see where I had to drill another hole to allow me to pop the magnet out and reset depth.

Tops1Some of the tools for this project, not shown are a drill motor (I cheated using a drill press!) Exacto hobby blade for flash, Drill bits (use a drill motor, Dremel tool, or even a hand pin vise) the Magnets are off ebay, I bought 25-100 of several different sizes just to have around the work bench. The dentist toll is just one of a dozen or so collected over the years (ask you dentist if they have a few old ones) a small ruler. You can see the “X” marked on the church steeple and the roof section.

Tools1Assembly line painting methods save time and money when doing large projects of even small projects where the pieces or miniatures all require a couple of the same steps such as priming, base color coats, washes, ect….For Resin buildings my “go to” primer is always Krylon Automotive Charcoal Grey (black) as it really adheres to surfaces well and is fairly unaffected by dirt, mold release, or other contaminants left on the model or mini, yep use this on my minis although I have just started trying Vallejo’s primer with very good results! It’s water based and allows me to use smaller amount in my airbrush (paints on with regular brush as well) saving both time, money, and the environment while still doing a bang up job! The Vallejo primer is also safe for plastics like the Perry and Warlord miniatures that the “Auto” primer would damage!

PrePrimePlease leave a comment if you enjoyed this article on these fine Napoleonic Buildings, I truly enjoyed painting and now using them on our battlefields! Here are a few more pictures, enjoy! Bill W


ZULU Nation


ZULUHospitall

Alphonse_de_Neuville_-_The_defence_of_Rorke's_Drift_1879_-_Google_Art_Project
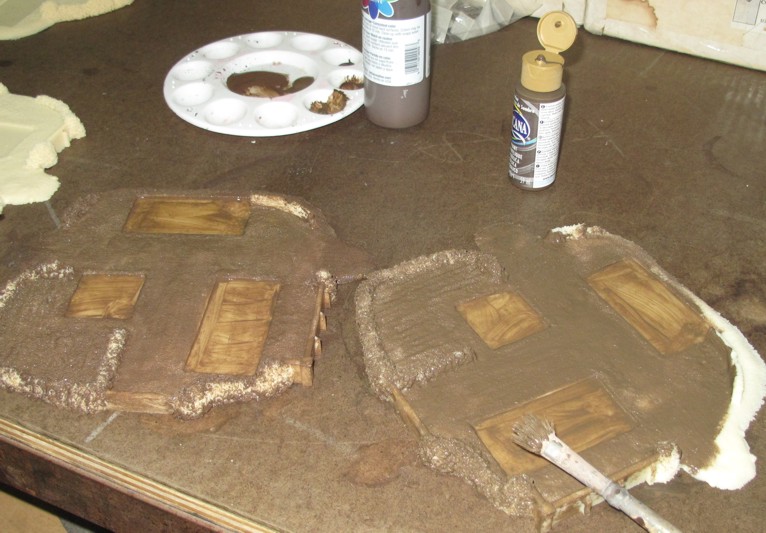
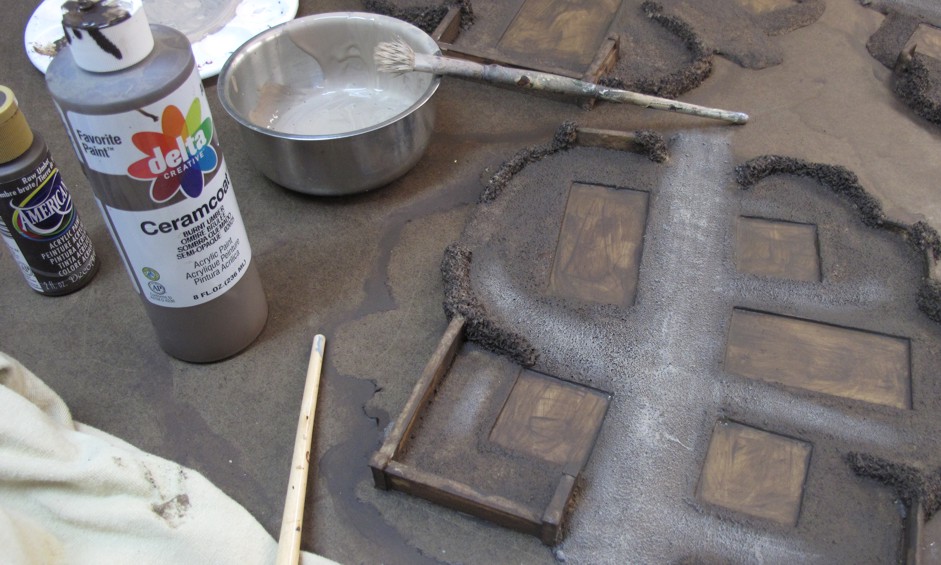
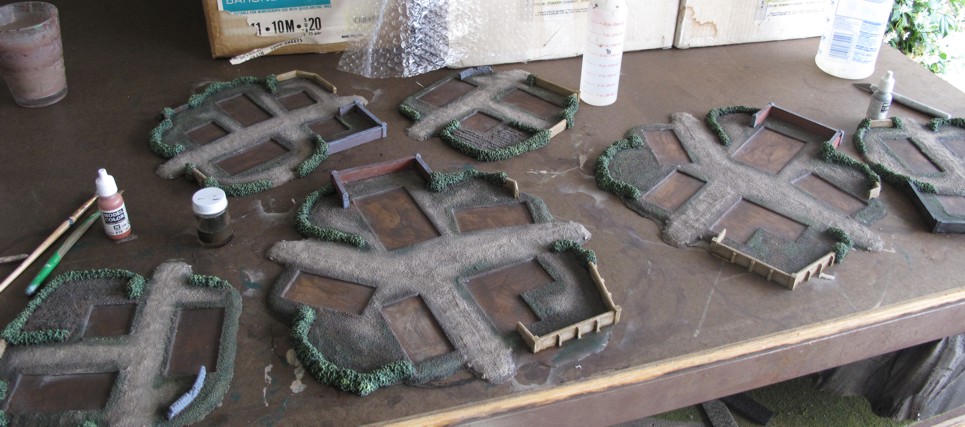
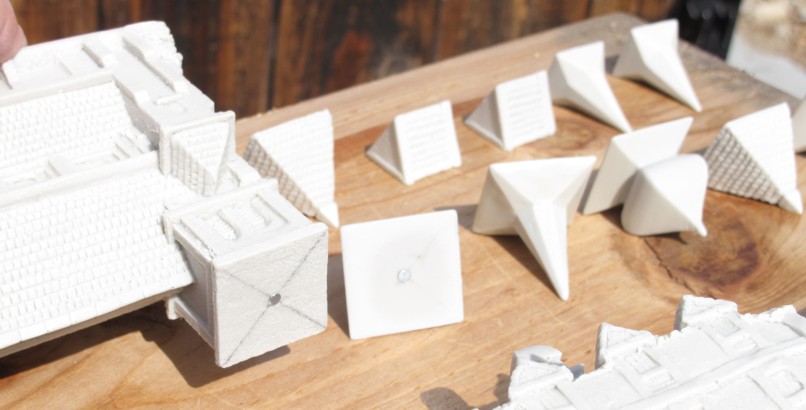
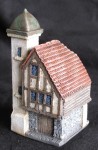
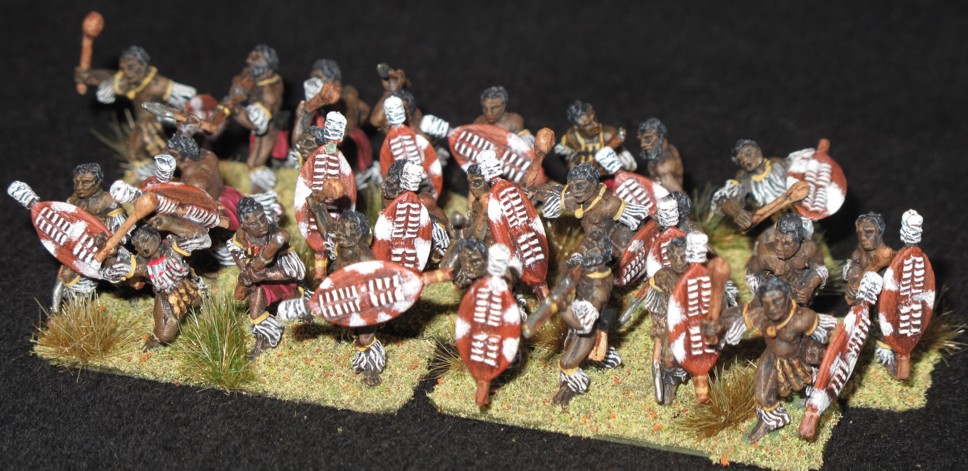
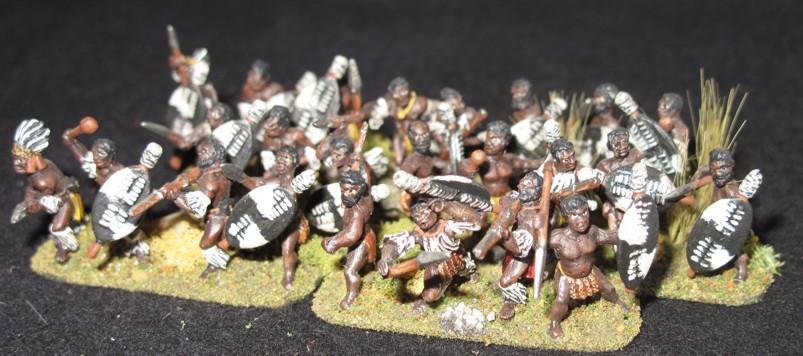
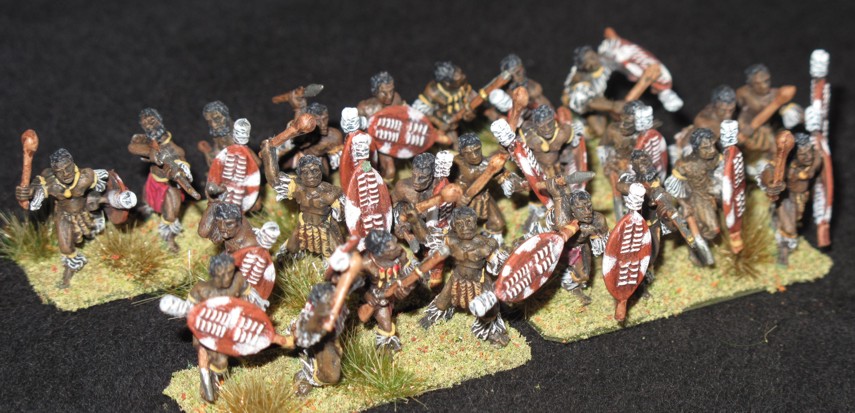
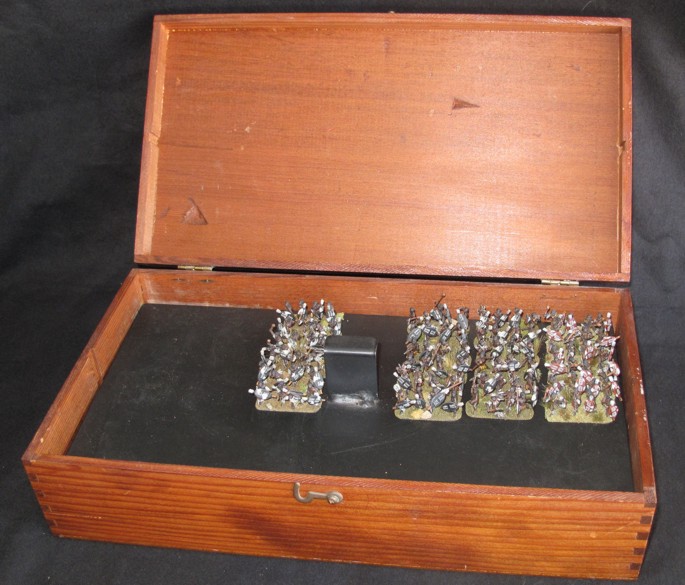
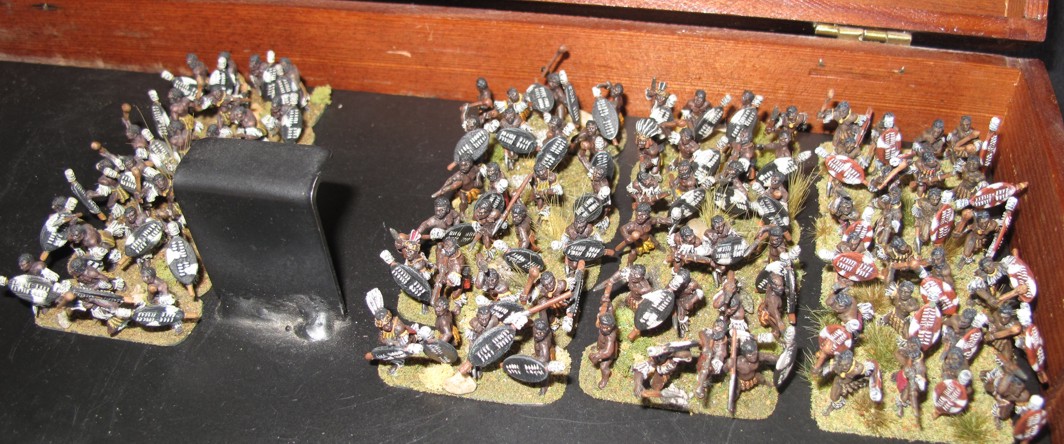
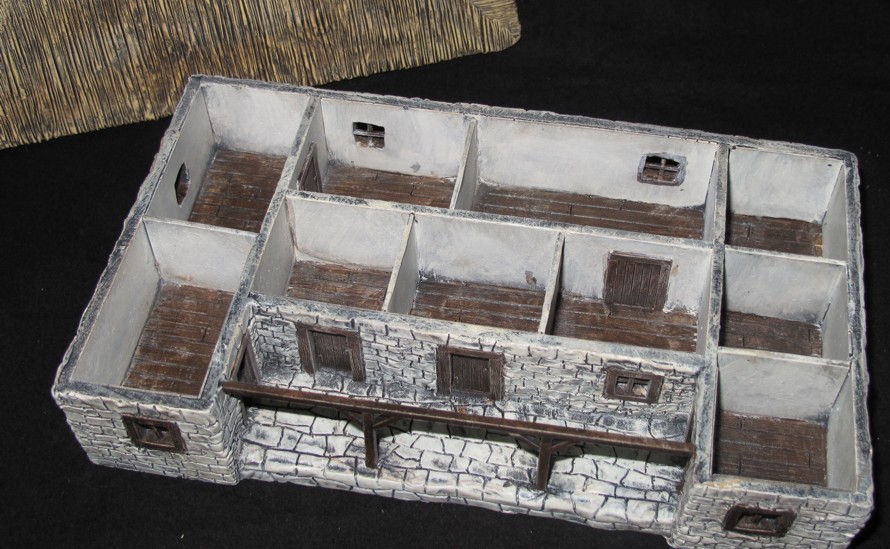
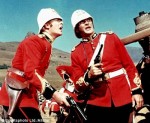
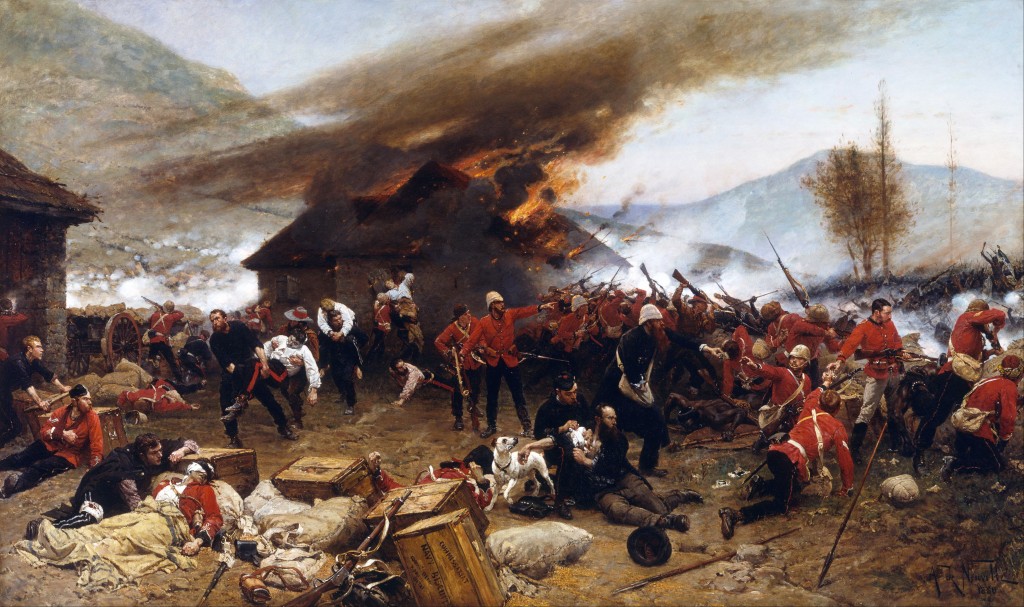
Thought I would post a few pictures of an ongoing project of mine. Years ago at the “HISTORICON” wargaming convention I picked up the “Old Glory” 15mm “Rourke’s Drift” ZULUHospitall3set. It’s a great set with all the buildings and figures you need to do the classic battle of the ZULU war where around 120 British Soldiers held of over 4000 Zulu warriors. The British finally defeat them and force their withdrawal!

ZULUHospitall2

Well it sat on my shelf for over 10 years without me painting it! Just to many other shiny projects got in the way….well I finally decided I was not going to ever do it and offered it for sale! it was bought by a good wargming buddy John Curran. Unfortunately John then convinced me to paint it on commission, dang I sold it because I did not want to paint it and now I was…lol!

ZULUMain

ZULUMain2Johns a good “egg” and has given plenty of time so I thought I’d put up some pictures of my progress for him as well as let those of you thinking about buying the set see them out of the box and painted! Below are the “Cook house”, “Kraal”, and the “Redoubt”

ZULUKrallThe castings are all pretty good and require only a little work to make ready for paint. The roofs do need a bit of work and I installed some little balsa wood blocs to keep the roofs aligned properly. I also hand made the porch roof supports on both buildings. The colors are as close as I could determine from evidence and I painted it with a fair amount of weathering. The casting were all washed, primed with automotive primer, painted, and thumbs_rorkes_drift-0001
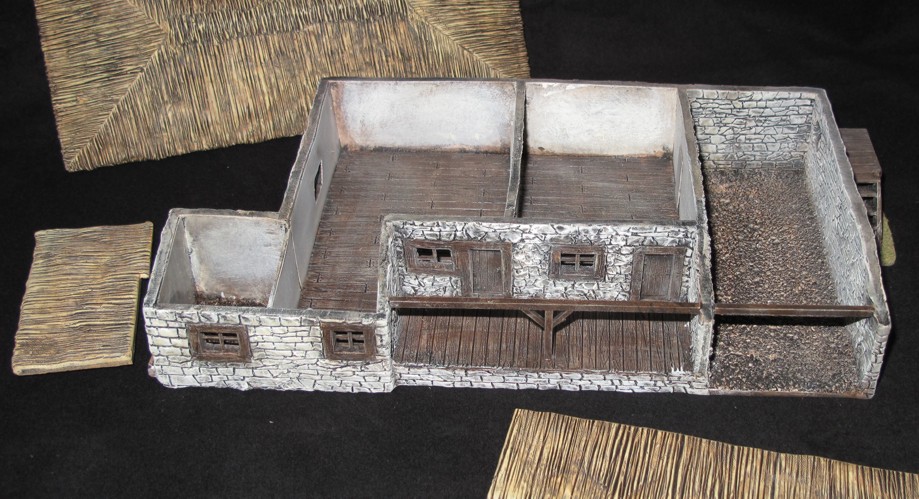
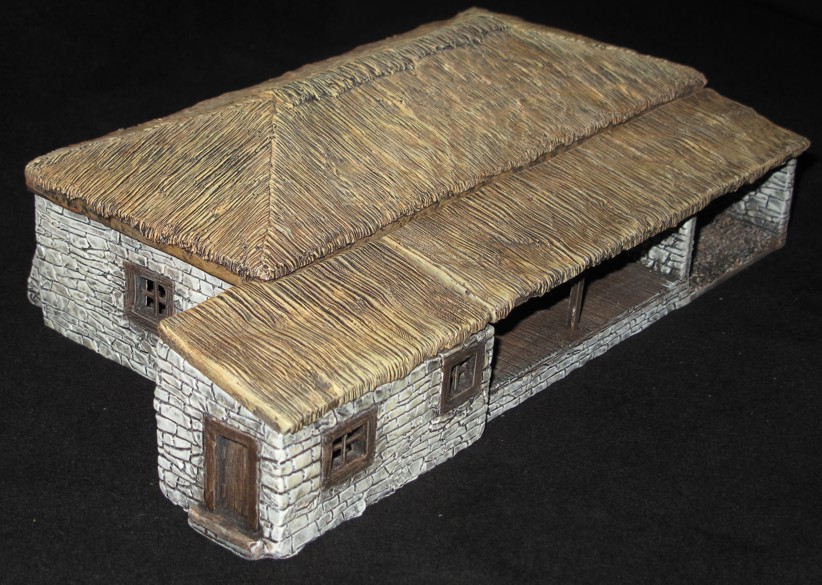
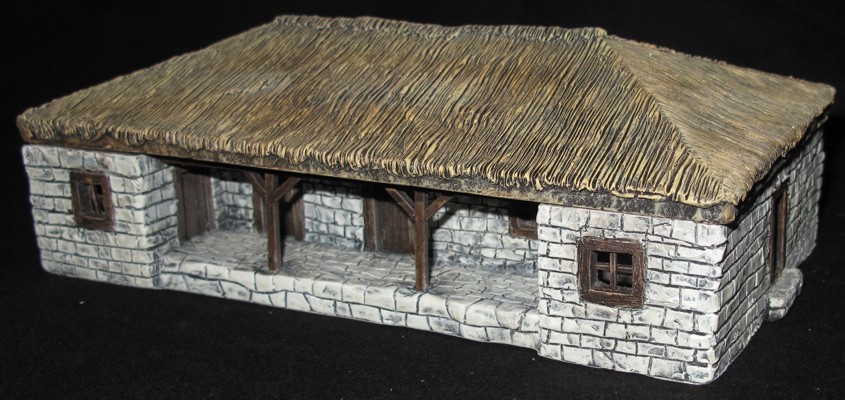
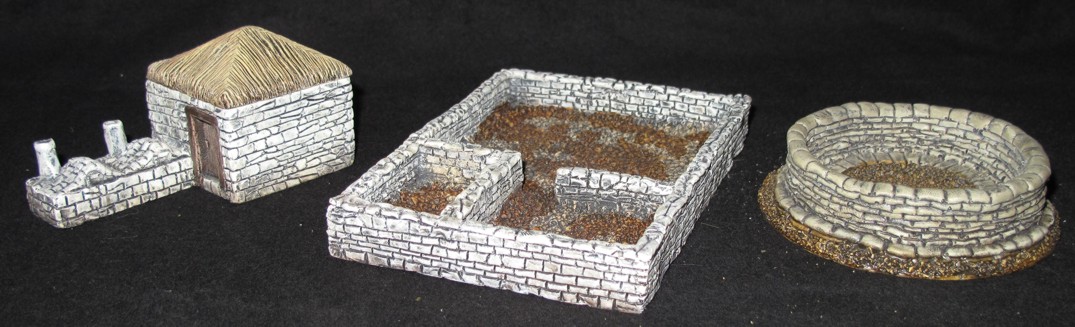
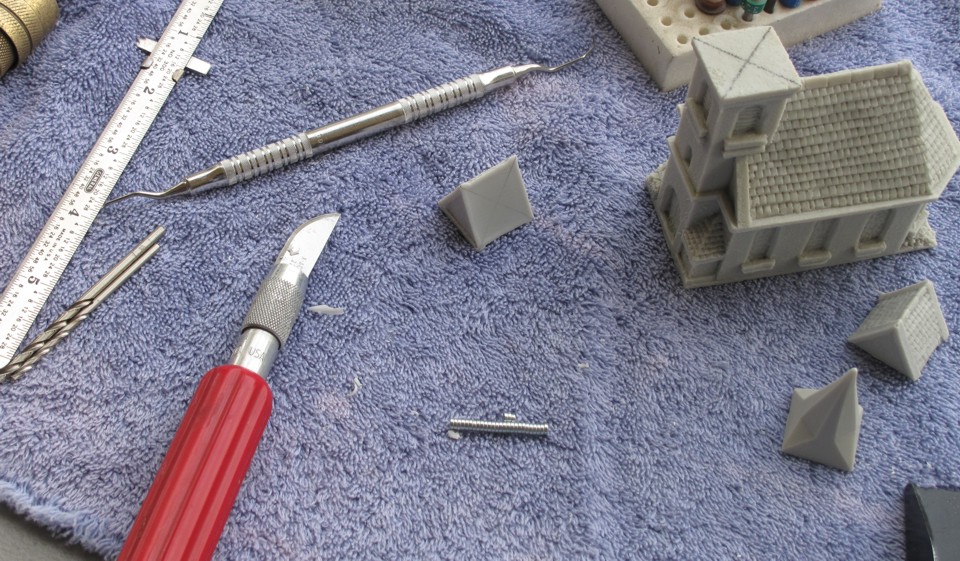
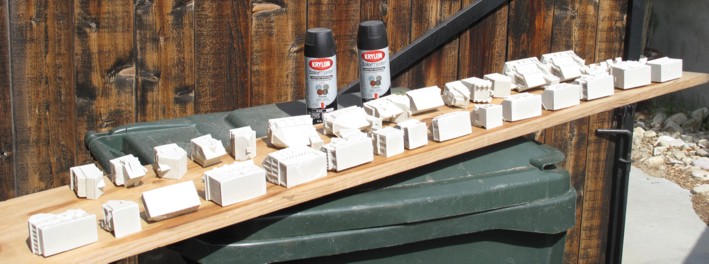
then coated in clear gloss followed by some matte spray.

Cant have “Rourke’s Drift” with out “Zulu’s” here are a few “regiments” married and unmarried. The different “Zulu” regiments had different colored and patterned “cowhide” shields for unit identification.ZULUfig2a

ZULUfig1

For now they are being stored in a custom case made out of an old wine box. So we have four 24 man regiments.

ZULUfig2  ZULUbox ZULUbox2