Dogs of War has a brighter future! Lights, Saga, Action!

Well just a few bits and pieces from “my world of wargaming”.

The family did a lot of last-minute shopping for me this Christmas and since “dad” likes weird stuff (wargaming stuff) many of my gifts didn’t arrive until long after Christmas. Not a bad thing since all through January the mail was full of great items to brighten the work week!

The first items were the “new” SAGA rules, meaning SAGA II, the basic rules, along with the Vikings and Crusaders supplements, and finally the Book of Battles. There are lots of game systems out there that redo their rules, some that do it with annoying frequency (and not always to make them better as much as make them money!) but Studio Tomahawk has done a good job with the “revamped” rule sets, tons of great reading and I believe an even better game justifying the expense in upgrading.

The rules do not really change in spirit or basic structure, its more a re-balancing, clarifying, and expansion of the first set. I have played 2-3 games using them and the transition was very easy and felt smooth.

I liked that the designers have continued to look at their product, the feedback provided by players directly, and through the active Studio Tomahawk forum then made the right changes to improve and expand the game without making original players of the game feel like their previous experience and armies were now useless (a common occurrence with several other well-known companies).

I’ve also been chipping away at my wargamers “to do” list and a big one on the list was to build some improved lighting for our game table down at the “Dogs of War” gaming group. Over the last year or so the “dogs” have been working to make the “Dog Pound” a better place to play, cleaning, building storage, tossing or selling unused / old gear, and one project was better lighting so we might better see all those beautiful miniatures on the table. This project took over a year of “thinking and research” to figure out just how and what would be the best way to do this. I / we wanted lighting that was easy to use and lite the table / miniatures without making the rest of the room look like an outdoor sports arena. I wanted the solution to look good, fit in with the club space, and not impact the members house much. Cost to build and cost of operation was also a factor. I wanted the unit to light our entire 10’ x 5’ table as evenly as possible so in the end I went with a 8’ long LED setup that would be dimmable as well! The unit hangs over the middle of the table and the design contains the majority of the light to the table exactly like pool table lights.

“Thar she blows” Lighting installed down at the “Dogs” above our 5′ x 10′ table!

I wont go into the building of the lighting fixture now, maybe latter in a “how to post or “Workbench page” but here are a few pictures to let you get the idea.

A dramatic improvement in my opinion. There is still a lot of work to be done on our remodel (chain will be swagged up out of the way)

Switch allows quick on and off as well as dimming.

To break in the new lighting Chris and I played a game of SAGA II using the Viking supplement. Chris took Vikings and added a Banner man while I played straight up Normans heavy on cavalry. I didn’t take many pictures but the game was fairly even for the first few turns until his Hearthguard charged up the hill to take out one of my Hearthguard cavalry units only to be counter charged by another of my cavalry units and wiped out.

Chris’s Viking hearth-guard charge up the hill eliminating one of my hearth-guard units only to be charged and wiped out by another of my Norman hearth-guard units the next turn! With our old lighting set up the excellent paint jobs on these guys could hardy be seen! This shot was done with no flash and no tripod!

The battle for the top of the hill raged on with Chris’s Warlord entering the fray hoping to end it. My Norman cavalry used the “Gallup” Activation/Reaction” option and moved off leaving his Warlord standing there surrounded by angry Norman infantry. A finial charge by my Norman warriors sealed his fate and outside of a few parting bow shots by both sides ended the game with a Norman victory.

One of my other gifts was the Studio Tomahawk rules “CONGO” they look great and I’ve already played one “test” game that was quite a bit of fun. I’ve always had a great fondness for the Darkest Africa figures from Foundry, Coppelstone, NorthStar, and others! I think CONGO will be the spark to get me painting sore of the pile of Darkest Africa figure on the shelf! I have played lots of Darkest Africa games in the past but some of the rules are a bit dated and no-longer available. These follow some of the same concepts from Studio Tomahawks other rules so may be a bit easier and acceptable to players familiar with those rules.


The first game under the new light, Darkest Africa isn’t so dark!

We used a pre-made scenario, basically capture the flag. Of course to make it interesting the flags were in the middle of a crocodile infested river flanked by enemy figures trying to put hole in you!

More on CONGO in the future…..

The finished light being test in my shop with a game of CONGO.

Swedish Army (Figures for a Friend) part 2

Just a quick post to increase my sad flow of content here…lol! I do a lot more painting, building, and even playing than I post because posting is just not near as much fun or rewarding as “doing”! The last month though I have been making a real effort to catch up on projects that have been sitting on the shelf in various states of completion for one reason or another. I started by cleaning up the workbench and trying to make my painting process quicker without sacrificing the quality of work, since for me the building and painting are the most fun, playing is just an excuse to build and paint. Churning out mediocre troops in large numbers is not my thing. To do this I built a pretty cool painting accessory and changed my method of handling with the figures while painting slightly, more on that in a future article.

One of the first things to move to the finished pile was the last stage of the Swedish Army circa 1600 I had done as a commission for a friend. I had finished and delivered the main army last spring but the last part was the artillery section. Now my friend had pointed out that he had extra crew members for the piece and that one of them (the guy fusing the cannon balls) looked like he was making Swedish meatballs and could I possibly do a little vignette based on that. Well that itched my scratch building bones no end!

There was a lot of scratch building, the fire, frying pan, meat balls, spoon, mugs in the figures hands, “picnic cloth”, Rocks, bases, and trees. I’m not going to explain what I did as those of you who build will know and those of you who don’t wont care, I’ll simply present them and answer questions from your comments.

I did them as two bases, a sort of serious one and a fun one.

While one group mans the guns the other prepares the “Swedish Meatballs”

The “Assault Group” figures are very nice and a pleasure to paint.

Logs, fire, pan, spoon, and meatballs all made of two part kneadite epoxy.

This little vignette was just a hoot to work out and build!

The figure priming the guns is just a great sculpt and fits very well kneeling on the gun. Really makes the whole scene work!

What figures are those?

“Who makes that miniature? I want one!” Most of us who game have heard that countless times and we reply “oh so & so miniatures out of England” or “such and such minis in New Jersey”. Some of us answer this way “I did” because we either did the figure from scratch or modified an existing figure.
Compared to 30 years ago when I started gaming the selection of figures, terrain, and miniature accessories has grown to a point where even some of the most obscure armies and periods are easily found and, in several scales, things we before only imagined are now found with just a few mouse clicks! For most people this is great, wonderful, but there are still quite a few of us who like the scratch building and customizing side of the hobby and that many times creates the problem that now commercially produced item do not fit the bill. When this is the case, for me out comes the saws, drills, sculpy, kneadite, green stuff, x-acto knives, and all the different materials and tools the scratch builder uses to bring his imagination to the table.
I thought for this post I would just toss up a few of my recent conversions.

These are 28mm “Old Glory” figures from one of their American Civil War packs. My buddy Steve has been painting a US force for use in battles from around 1880 to 1910 (Spanish American War to the Boxer Rebellion) and wanted some artillery limbers for them. He found some ACW limbers that would work but the figures all wore the Kepi style hat that would be wrong for the period. I took up the challenge to modify them with new headgear.

They came out better that I expected and only took about 15 minutes each to do.

On the right figure with “Kepi” style hat still in place. On the left, Kepi cut off and sculpted replacement.

The “Western” style wide brimmed hat was very popular with the troops in the sunny hot climates.

I think the hat conversion gives them the feel and look of a late US artillery crew.

“Escort Service” part 2

These will make a great unit for the “Escort” scenario in SAGA

So for Part 2 of my “Escort Service” I finished up my pig herder and his swine. I also based these guys for ease of movement but tossed in a bit of a twist in that I did it like a movement tray. I did this because I wanted the ability to use these figure singly in other situations.

To make the base I used some sheet polystyrene the same thickness as my “LITKO” bases used for SAGA infantry, about 1/8 inch. I arranged the figures to my liking and then traced onto the polystyrene the area that would be the base. The base was cutout using a hobbyist sized band saw from Micro Mart.

This is a great tool to have in anyone’s tool arsenal! If you do not have one a “cooping” saw will do the job as well, well almost as well! The cut was done with a sloping angle edge to make it blend better with the terrain.


Next a sheet of thin magnetic sheet stock was cut in the same shape. This will later be contact cemented to the styrene base to both hold it to the storage drawer’s metal lining and help hold the figures in because of their magnetic bases.

I arranged the figures on the base again and this time traced their out lines onto the styrene in preparation for cutting the holes the figure will sit into later. My figure bases are round and 1 inch or 25mm. I used a 1 ¼”  “Fostner” bit in my drill press to cut the holes. A “Fostner” bit cuts perfect round holes not possible with a regular drill bit. Not cheap but you will only ever need one and used for cutting plastic will last your lifetime!


Once the holes are cut the pieces are assembled using contact cement and with a bit of finish sanding is ready for finish decoration. I use a recipe of Durham’s “Rock Hard” as a base material in landscaping and in 20 years found no problems. Mix it 80% with 15% white wood glue and 5% water. Just experiment with this formula until you get it right. It should be the consistency of porridge, easily spread on and a bit flowing. As it dries u can push it around for a natural unevenness. The glue is important since without it the “Durham’s” may chip or flake with table use.

Even though the individual figures are removable with a little effort you can make it blend very well and hardly noticeable in the base.

Once again I get wrapped up in the building and forget the pictures but I think you get the idea and feel free to ask question in the comments. I think it came out great and this now finishes 2/3rds or the “Escort Project” so see you soon for the last installment!


Building units for an “Escort Service”

I always like to set “my” minis apart from the rest of the pack, go the extra mile. I enjoy when gamer’s say “are those so and so manufacture?” because they look a bit different. I do this in a couple of ways, painting, basing, and customizing the figures themselves. I like variety in my figures and sometimes a line doesn’t have enough different poses for me so I’ll grab some sculpting putty (two part green stuff) and have at it. Now I’m no sculptor, I don’t do whole figures, but I’m pretty fair at cutting models up and customizing them.

I’ve been trying to clean up some lose ends on the work bench and one of the projects sitting on the shelf for a while has been some Dark Ages civilians for SAGA scenarios. For the “Escort” scenario I needed three objective units and I had the minis for several carts, and a pig farmer and his pigs.

The collection of figures and carts getting prepped for “Escort” duty!

Most of the minis were from Gripping Beast and they are great figures BUT I was not satisfied with the way they would appear around the carts. I just didn’t think the poses were quite right; I wanted them to really appear as if they were pushing/pulling cart. There was also no wagon driver…. This led to them sitting half done on the shelf.

After looking at the project for about a year while I painted a few other SAGA warbands (Normans, Vikings, and Anglo Danes) I decided to do something about it. I decided that there was no way around it I was going to have to create a sitting driver. Now I’m no sculptor but I’m not bad at taking one figure and modifying it to be what I want, in fact that’s one of the most enjoyable aspects of this hobby.

I have nearly all the Foundry Vikings and consider them the best Viking line available. I have quite a few still unpainted and after going through them I soon found a likely candidate for customization. I wanted to have;

  1. One arm using a whip.
  2. One arm holding reins
  3. Legs easily modified to sitting position.
  4. No armor.

I found a great candidate and prepared for “surgery”

Arms were almost right to start with but the legs would be a lot of work.

The Figure was wearing a sword and that would have to be removed.

Foundry uses a good quality metal in their figures and cutting and filing are very easy. After studying the figure for a bit I determined where and what kind of cuts were needed. Some cuts like the arm were completely through but most were wedge type allow removal of a section to allow bending of the figure into the proper pose. After the cuts and bends the areas were made to look right with Kneadite “Green Stuff” sculpting putty. Cutting, bending, and lots of filing were done to the rear buttocks and leg area to create a sitting figure. To help “blend” the figure into the seat a sheepskin seat cushion was sculpted from more green stuff

Yellow lines show cuts made.

The figure also got a whip made of brass rod and a “Greenstuff” handle in the arm that normally held a spear. The green stuff was give a day to cure and primed and painted.

Brass whip really gives life to the figure!

The cart itself had already had work done to it to make it look better and have more detail. Since I wanted to have the driver holding some reins I wold have to create them and make it look believable. Very little real evidence on rigs from the period really exist but ox carts still in use today use much the same systems so a believable modification was worked out.

Sculpting putty was used to create pads on yoke as well as blend in the area where the horns were glued on.

I keep a lot of small cheap chains bought at a local craft stores “bead” section and used a few links to create the “iron work” as well as some small aluminum wire twisted and painted to look like rope.

Do you need this kind of detail? “I do!” it’s eye candy! The rope wire will be bent under the oxen’s necks, cut to length, connected, primed, and painted.

The white “centra” board is a thick plastic stock that later will be carved and customized into the base

Well it’s about here in most of my projects that I just get sucked to finishing them and forget to take pictures but its mostly done anyway. I did the reins, the base, and few little touches. There is still another figure to do but he will come later. Here’s a few closing shots of the finished project….enjoy! If you like it please leave a comment, it keeps us going!

The iron yoke work shown earlier can be seen here in it’s finished state as well as the base work. Ancient dirt roads looked much different than the ones used by cars today.

I think the finished yoke work came out nicely. the reins are simplified for project, but most just involved turning an animals head in the direction you wanted to go.

Much of the baggage was created from “Sculpy” modeling clay, as well as the tarp.

The reins are thick thread painted as rope and a hole was drilled in his hand to allow pass through. I really like how the figure came out. I not sure how the figure feels being taken from “warrior” status down to “cart driving farmer”?

Well it was a fun project and one of those pieces of “eye candy” that makes the battlefield come alive! I have several more projects in the “Escort” series and they will follow shortly.

Table ready!


Total Battle building project

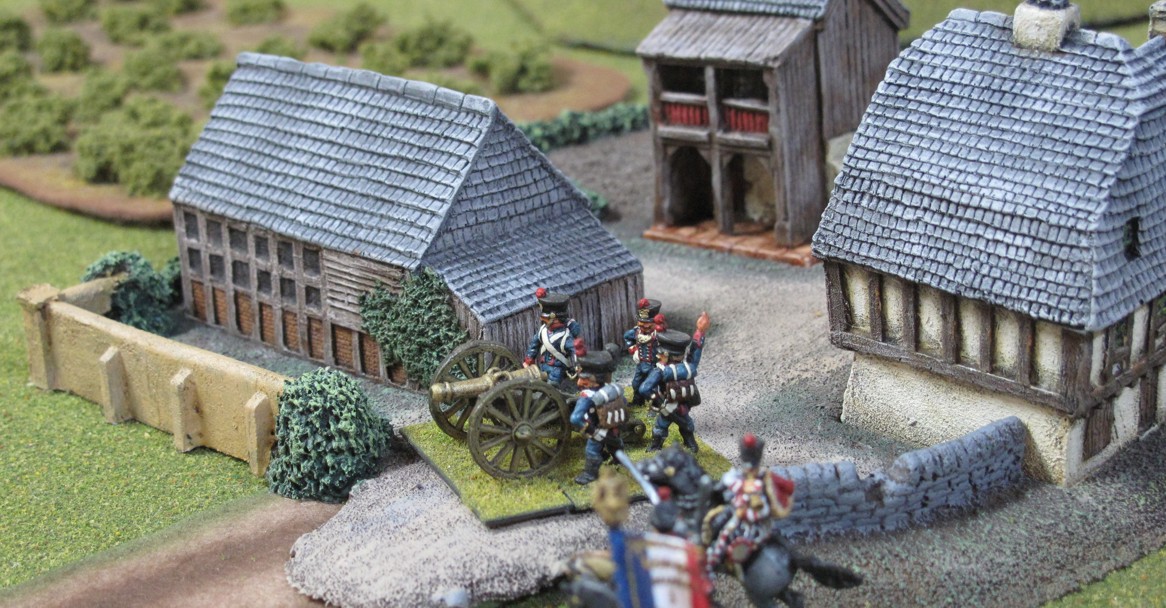
I have written a few articles on the TOTAL BATTLE miniatures buildings and how much I liked them. Well I still like them and everyone who plays in my battles echos that along with my decision to go with 10mm buildings in 15mm games for a better look when representing towns and villages.

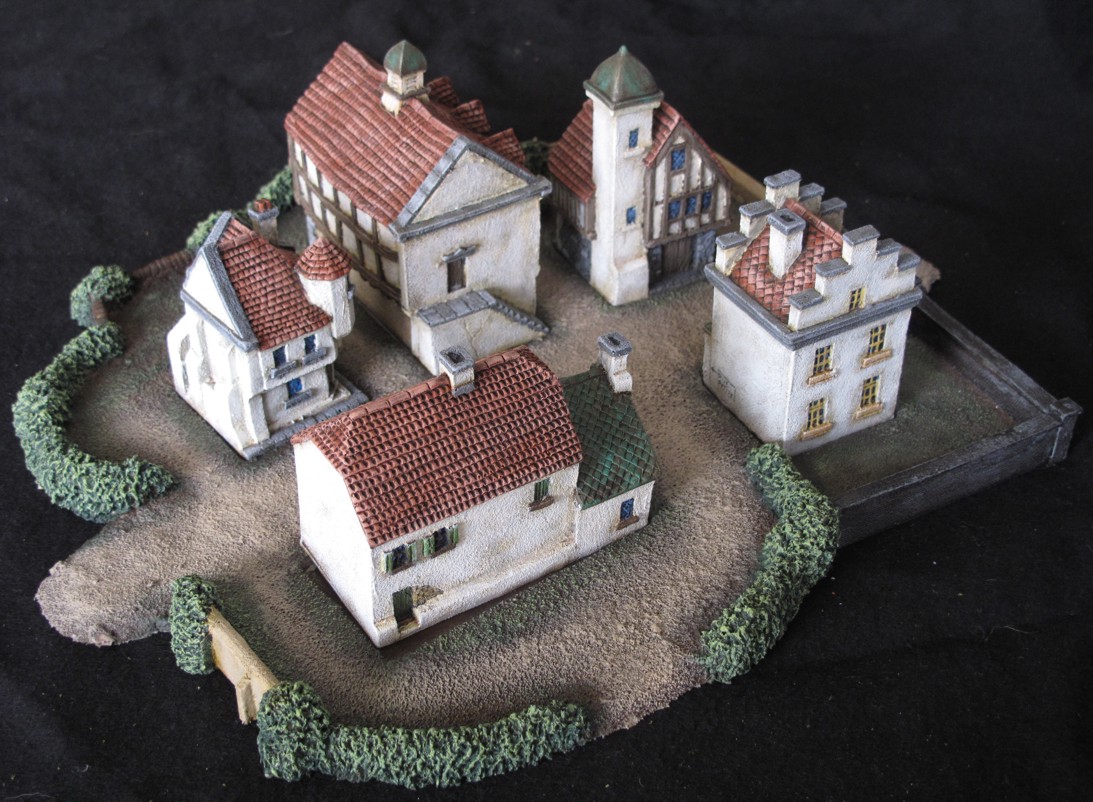
The slightly smaller 10mm buildings allow more buildings using the space that would only allow two or three 15mm buildings

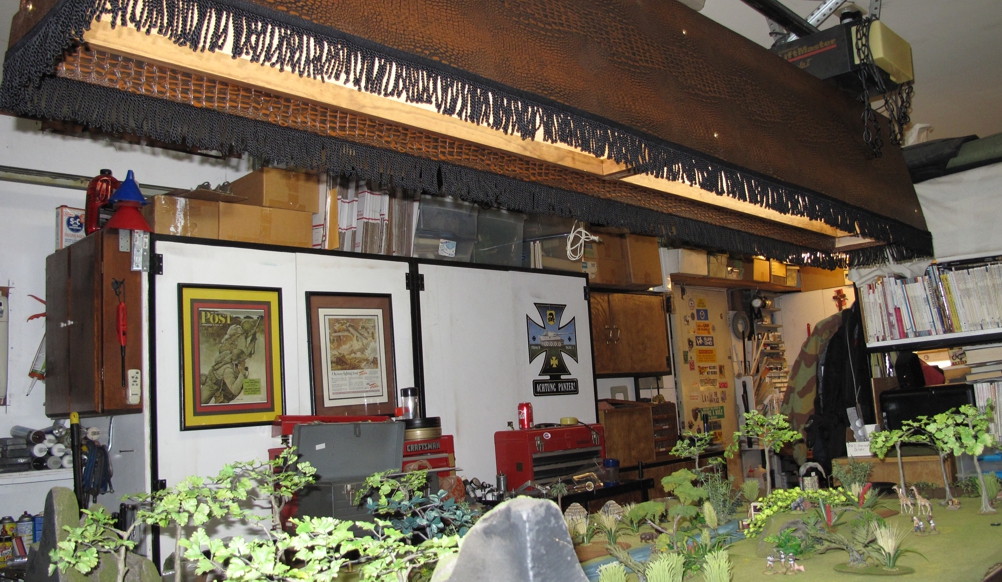
Over the last year in between other projects I have been painting these buildings and occasionaly transporting them to games not at my place. I quickly realized that to prevent dammage to them I needed to come up with safe and easy way to transport them.  For years I have made an effort to bring innovation to wargaming with miniatures, especially when transporting miniatures and terrain. I dare say some of the things that are common today in the miniatures world where developed by myself and a few others. Bold statement? Yes but when I started miniature gaming people were slapping 3-4 colors on mini’s, gluing them on some painted cardboard, and transporting them to games in old pizza boxes!  Times have changed!

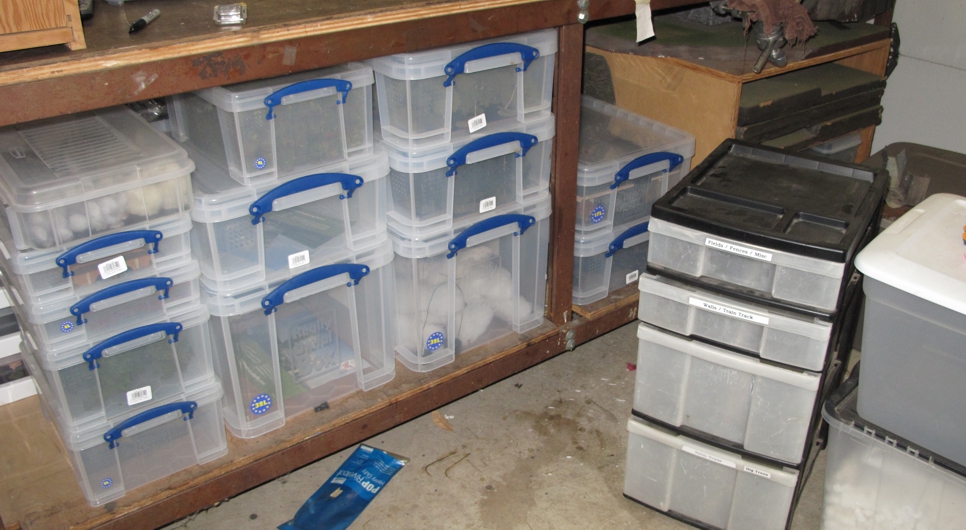
So this article is about finding a way to store and transport all my lovely Total Battle miniatures buildings easily and with out damage!  Recently I decided to change the way I store terrain at my place because overtime I found much of my terrain was getting dusty and dull looking even though it was stored in those multi level plastic storage drawers. The drawer system did a pretty good job but over time dust would still filter in especially since my gaming area shares the same space as my shop and terrain making area. The drawers were also not that convenient for transport. My career in the movie business had given me a lot of experience in storage and moving of equipment safely so I’m a bit of a stickler when it comes to this. I want a system that works quickly, easily, and most important does the job. I searched long and hard and finally settled on a plastic stacking box system from “the Really Useful Box” system. The system is readily obtainable, strong, and economically priced. In the US they can be found at Office depot and Office Max as well as tons of internet sellers, I’ll list the common sizes I use at the end of the article but the one used for my buildings box is the 17 liter box.

The beginning of the “new” system. Old drawer storage on right and new “Really Useful Box” system on left. Easy to see and grab what you need and the stuff stays clean!

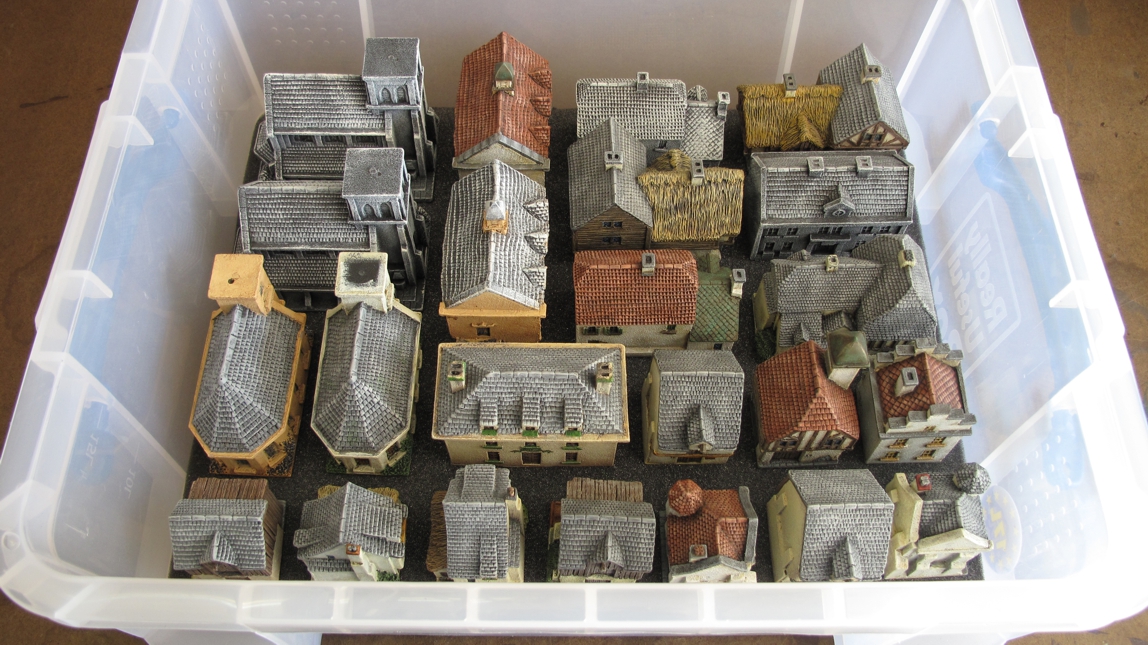
Over the last year or so I have been replacing my “plastic drawer” system with the “Useful Box” system and had reached the point of finding a good way of storing my Total Battle buildings in one. I wanted to keep all the buildings in one box but I also did not want to use too big a box (length & width) so I settled on one that was smaller but deeper. This box would to hold most of the buildings in it on one level but required me to “create” a second shelf in the box for the balance of the buildings with a bit of room left over for a few other terrain items.

The next step was to figure out how to keep the buildings organized and secure in the box so to prevent damage as well as easily see that everything was there (useful when picking up after a convention/away game when your tired and may miss something. My first idea was to use some powerful Neodymium Magnets in the base of each mini and then line the box bottom and shelf with thin steel. This required drilling the base of a building and then gluing a magnet or two flush in the bottom. It worked ok but not perfect. If there was a jar or a lot of vibration to the box the buildings could shift and it would be a bit of work to modify all the buildings….I didn’t like it. Next idea was to go back to another tried and true method we use for camera gear and other delicate gear, foam cut to size. This too required some work but in the end was a better system and not that hard, it was the way I went.

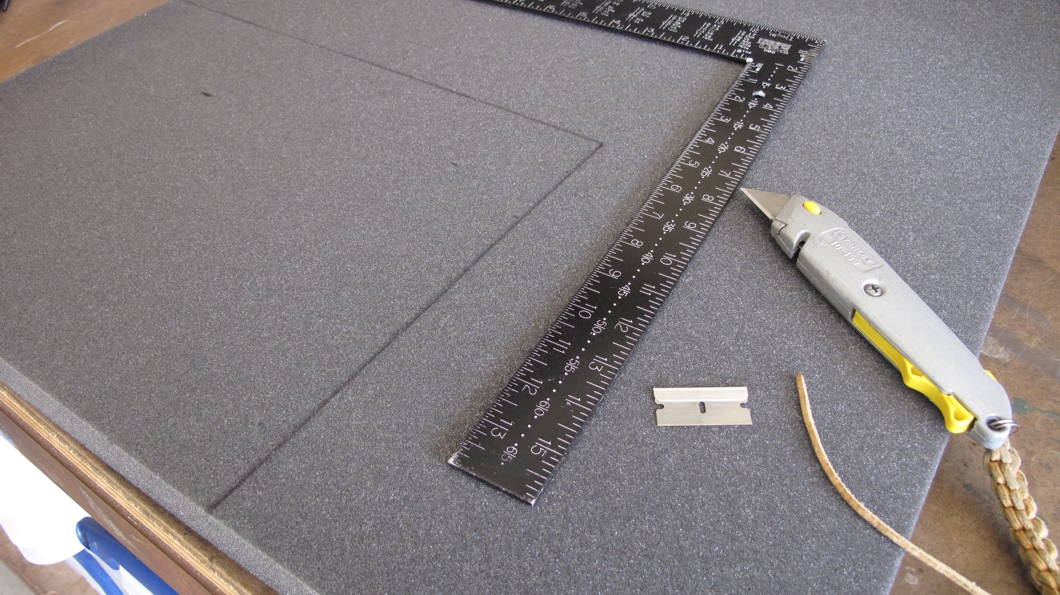
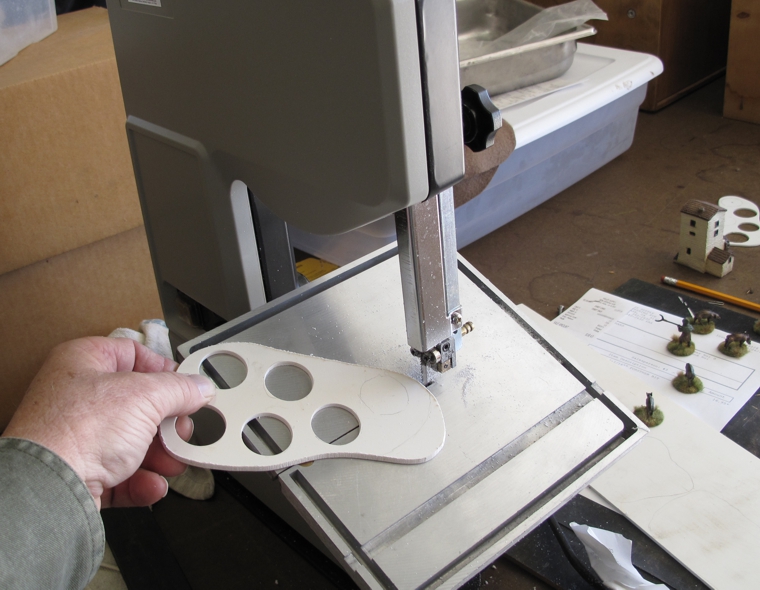
The right tools always make the job easier, safer, and faster. Note the single sided razor blade.

I recommend getting a good piece of foam not the white or tan soft foam found in chairs and couches as that foam tends to age and deteriorate when not sealed up in furniture. Use the grey packing type foam, it’s stiffer, last longer, and cuts easier. You can pick up this foam at any foam supply cheap. I bought a 2’ x 6’ one inch thick piece for $12. This project would only use around 2-3 feet so plenty left for other projects! To cut the foam a RAZOR sharp tool will be needed, utility knife, xacto knife, or even the razor blades made for single sided cutting. I used all 3 types and found the simple razor blade to be the best. Blades will dull up and this project took three.

Measure the bottom of the box and cut a piece of foam to match. Make sure to get a tight fit. I cut a bit over size and then trim down. Next the buildings are laid out on it and using a fine tip permanent ink marker (this ink wont later rub off on buildings), one by one mark the buildings position on the foam. Turn on some music, take your time and cut out foam from where the buildings will sit. It’s important to make these cuts just right. Too tight and paint may rub off over time, to lose and your buildings will fall out. Take your time and watch your fingers.

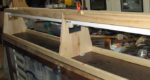
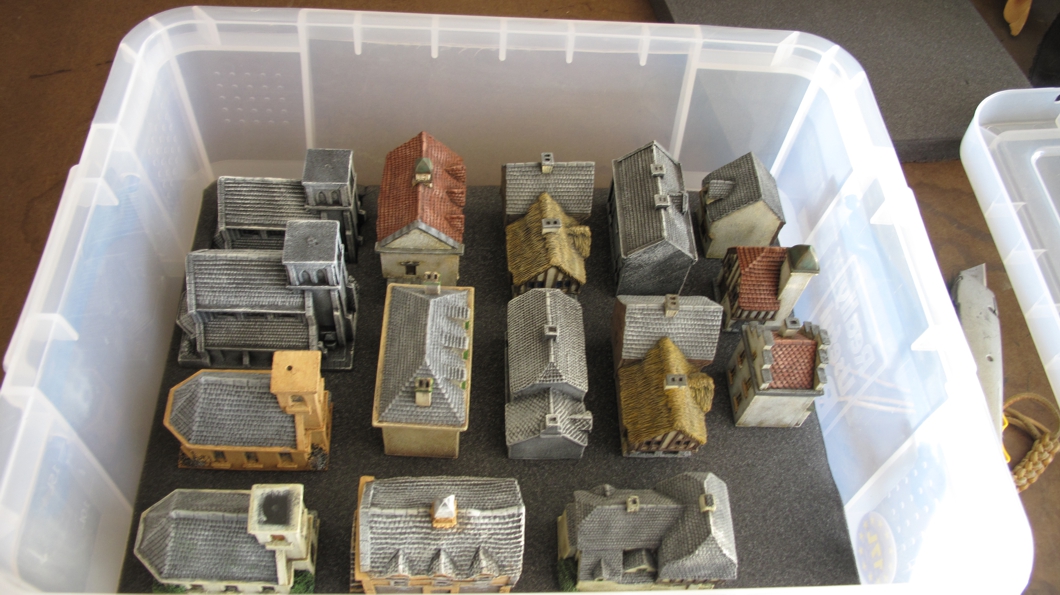
My first attempt at spacing was a bit to crowded and would have required the foam to be cut to thin and then lose needed strength so after a bit or rearranging the bottom layer looked like this.

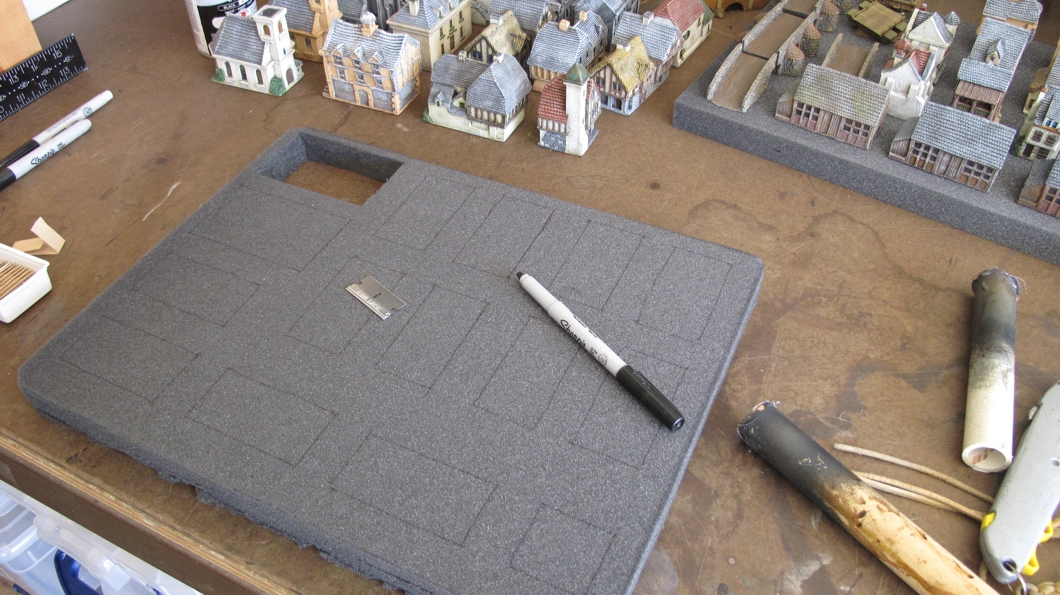
Now that I had the spacing to my liking it was time to cut the foam.

Check your arrangement several times and when you are sure it works its time to mark the areas that will be cut out. Use a fine tip permanent ink sharpie for this if you have one, other markers may have cheap ink that wont really dry and rub off later on your buildings!

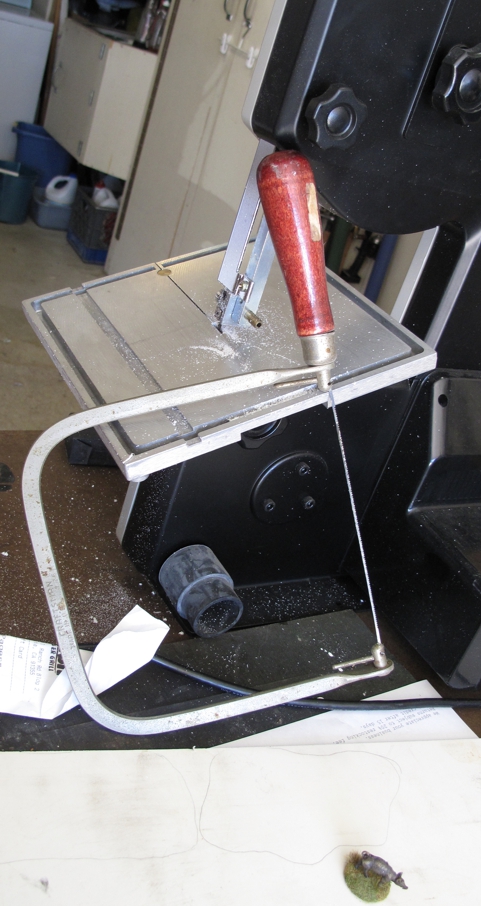
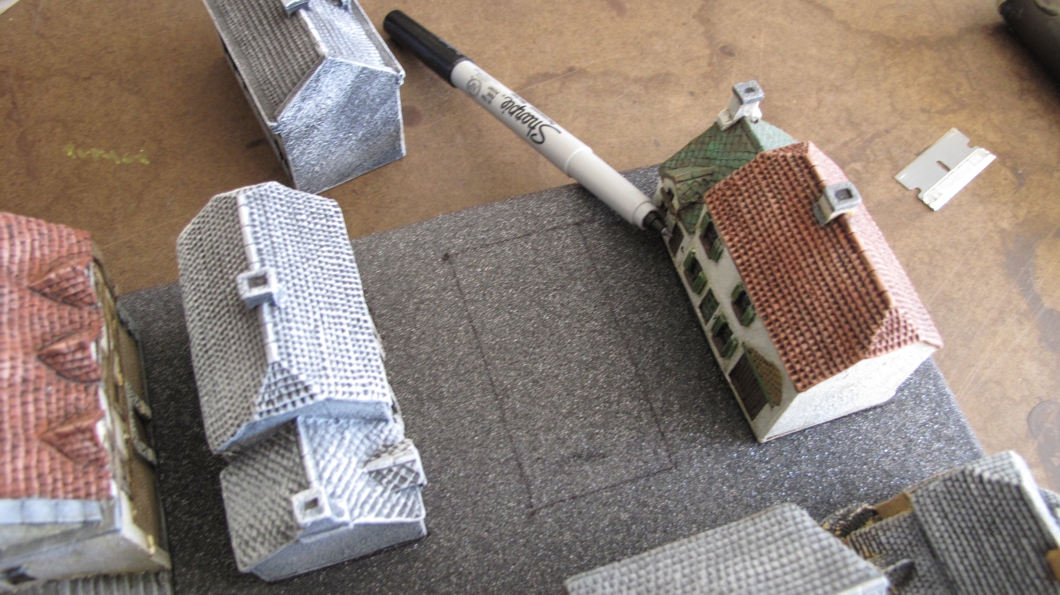
Cutting foam or anything else requires careful attention to what you’re doing! First to prevent injury to yourself and secondly to make sure you get the cuts right! Take your time! There is an old saying about cutting “measure twice cut once, measure once cut twice!” and its always possible to remove more material but once a cut is too big your in trouble. I did all this building cutting and fitting with a single sided razor and used 3-4 blades since even foam dulls the blades.

When cutting I made sure I cut slightly on the inside of the line ensuring a tight fit and remembering I could always take more off if I needed to. Switching to new blades after abut 5-6 buildings made sure the blade was always sharp enough to be able to cut by simply pushing straight down using a slight side to side motion.

As with most of my projects and articles at a certain point I get so wrapped up in it I start forgetting to take pictures! When I finished the bottom section and started work on the second level that was the case for this project.

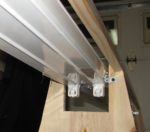
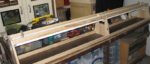
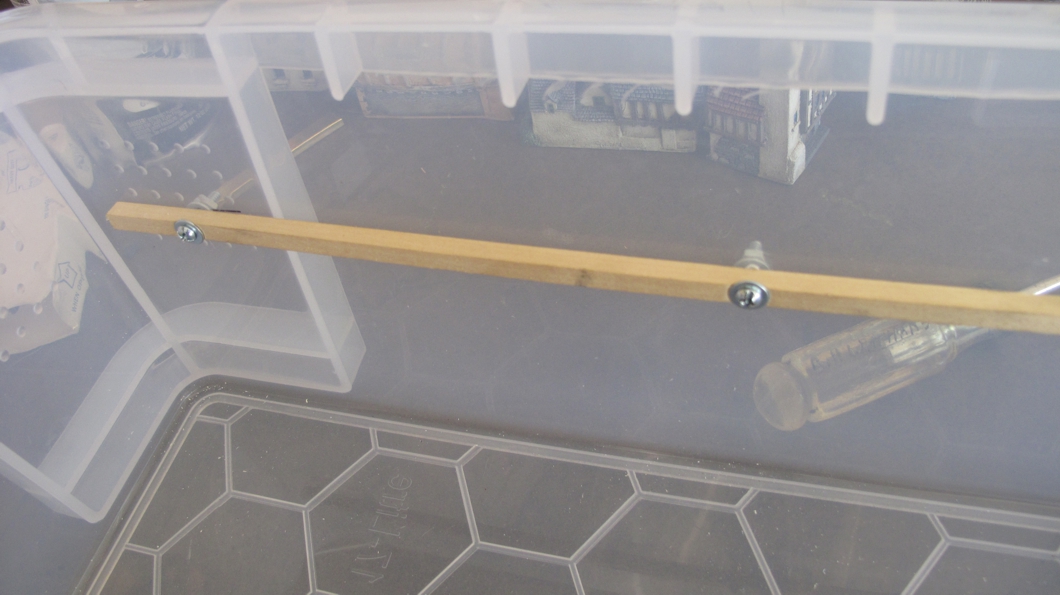
My top shelf will sit on these two wooden “runners” holding the top shelf just above the bottom buildings. For my project full length runners on each long side were strong enough to support the top shelf. Take care to make sure these are level and an equal distance off the box bottom on each side so the shelf sits correctly in the box.

The second level would be made of 1/8th inch plywood (luan) and sit JUST above the tops of the bottom level of buildings. The bottom level hold the biggest and tallest buildings, the top shelf the smaller buildings (height wise). Make sure you plan all this out at the beginning of the project!!! Be doubly sure that all the measurements and tolerances will work out!

The top shelf being 1/8th inch is easy to cut using a small power or hand saw, again cut oversize and trim to fit. A second piece of foam is cut for it and the process of layout and cutting in the buildings happens just like the bottom shelf. I haven’t yet but I may use some spray contact cement (3M 77 spray) to bond the foam to the top shelf.

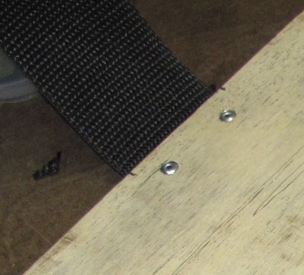
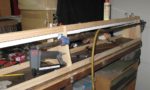
As a final step I put a couple of flexible “tabs” on each end of the top shelf so I could lift it out and get to the bottom section. I started with couple of temporary tape tabs to allow me to get the correct spacing and balance for the tabs. Later I used some 2 inch webbing material pop riveted in to create a strap for this purpose. Don’t complete this step until you have arranged and cut in your buildings since the weight may not be balanced meaning your straps may need to be off set so you get level lift out of the box! Find the balance and center of gravity and adjust the straps to match this ensuring a level lift. Pop Rivet guns are cheap and a really useful tool to have around the house! Holes are drilled in the shelf insert and the strap where the rivets will go. I used a hot wood burning pen (a small heated nail will do!) to burn and seal holes in web strapping and a lighter to melt and seal edges of strapping after cutting.

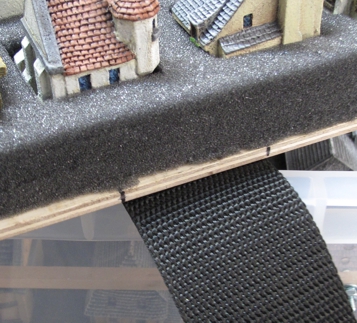
Top shelf in and tabs just lay across the top. Some lose stuff has still not been cut in yet.

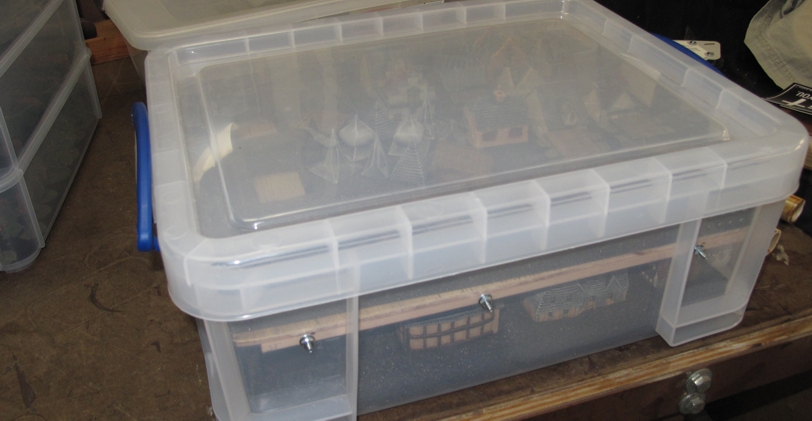
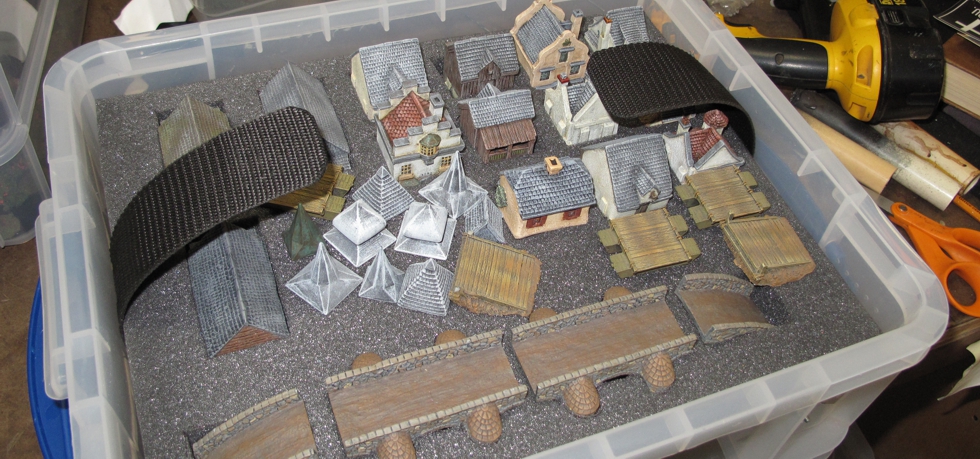
Finished box. You could drop this setup from several feet and have no damage to the buildings! the box may be damaged but the mini’s will not be.

All in all I think this project came out very nice and made my hauling these buildings down to a game easy and safe from any damage. It’s also going to do a much better job of keeping my terrain looking good for years to come!

The only fault I could find with these boxes is they do not give dimensions on the box except to list capacity in liters. Their website does give the dimensions as well as a picture that does a fair job of letting you see which ones match for stacking.
I’m currently using:
64 L, 33L (both stack) Big
32L, 17L (both stack) Medium the 17L was the size used for the building box.
9L, 4L (both stack) Small


Are your “Old Figures Washed up”

One of the first boxes I made over 20 years ago! Even in the cleanest conditions dust will accumulate over time!

One of the first boxes I made over 20 years ago! Even in the cleanest conditions dust will accumulate over time!

Over the years I’ve amassed a pretty large collection of miniatures. Recently I have been going through them and paring down periods and scales to stuff I’m really going to game with or at least build in my lifetime…. My buddy Steve and I used to be “Big” into American Civil War and built up large collections of 15mm figures for our then favorite rules Johnny Reb 2. Well over time you find other periods and scales and the figures find themselves on the shelf, disused for years.


Even in the case, and the case in a cabinet, dust manages to creep in over the years! The outline in dust shows were the first figures have been moved for washing.

Even in the case, and the case in a cabinet, dust manages to creep in over the years! The outline in dust shows were the first figures have been moved for washing.

Recently in going through my collections I took a look at my ACW collection, recalling all the fun times had playing with them I remarked to Steve “we should start playing these again” he agreed. I gave my figures another look over and noticed they just did not look as nice as I remembered them?Over the years a fine layer of dust had coated them, even stored in my custom cases dust had crept in. What to do? Well a bit of air and a soft brush might help but I have always found that it was tough to really clean them well that way as the brush misses a lot.

For almost as many years as I have painted and played minis I have pushed the boundaries of prepping and painting them. Long ago and before it was common or even popular I was priming with “automotive” primers to give the paint a secure “bond” to the metal, resin, or PLASTIC! Years ago I began gloss coating my figures before “Dull” coating to protect them from damage caused by dropping, pizza fingers, and normal wear during play.  I knew that since these figures were some of the first I had used that method on that it would be safe to WASH them!!! Yes wash them… put them under a “gentile” stream of room temperature water and brush them gently with a large, VERY soft, long bristle,  brush. I use either a cheap one from a craft store or better yet one of my wife’s “old” makeup brushes.

By having the water directly hitting the brush it will spread the bristles and push them into and across the figure.

By having the water directly hitting the brush it will spread the bristles and push them into and across the figure.

Gently drying, no het. I'm also blowing in an oppisite direction of gravity to help from blowing figures off to floor. this would be better done over a table with a soft clot below.

Gently drying, no het. I’m also blowing in an oppisite direction of gravity to help from blowing figures off to floor. this would be better done over a table with a soft clot below.

If you try this I recommend doing only a few figures at a time so you can monitor the effect of washing and if there is a problem stop before it affects your entire army. Gently work the brush around each figure as the water flows the dirt away.

You also will need to force dry your figures. Just letting them set and “air” dry is not recommended as you may get some “spotting” from the minerals in the tap water. I should mention at this point that ALL my figures use a magnetic basing system (some figures directly on magnets, some on metal, with either metal or magnet lined drawers). The magnet makes the process much easier since the figures will stick on the surface of the metal or magnet covered board I use to wash and dry them on. This keeps the water and air pressure from tumbling the figures off the board… If you have a distilled or water filter system on your sink use that.

Using air compressor (on low)

Using air compressor (on low)

So once you have washed your figures you need to dry them and you can do this several ways. I use air pressure (soft) just enough to blow water off and leave a clean dry figure. I have a air compressor in my shop with adjustable nozzle, but a small can of “Dust Off” (compressed air) or a hair dryer will work fine. If you use the hair dryer don’t use the “heat” just the cool air. Heat may damage the paint or basing material (some magnetic sheet material has a layer of plastic glued to it and heat may cause the glue to melt and the sheets to separate). You need to decide what works best for YOUR figures.


Those dusty Confederate figures cleaned and returned to their clean drawer. Its a bit hard to see the difference in web pictures but its very apparent in person. These figures need some re-flocking but I'm going to re-base them for "Fire and Fury" anyway.

Those dusty Confederate figures cleaned and returned to their clean drawer. Its a bit hard to see the difference in web pictures but its very apparent in person. These figures need some re-flocking but I’m going to re-base them for “Fire and Fury” anyway.

Another reason for “drying” the figures is that most of us are using regular PVA (wood glue) for applying our basing materials and this glue will break down when its wet to long. I get my figures fairly dry, no standing water on them and let them air dry the rest of the way. WARNING!!! all my basing is magnet, steel, plastic, or some combination of these “water” resistant materials, if you are using cardboard stock (dude it’s 2015 not 1972!) be careful as the water may/will damage your basing. I now gloss coat my basing materials after the figure is finished so its sealed along with the rest of the figure. (I’m sure my figures will last many generations beyond me!)

So trot out those old figures, wash them up, and give them a new lease on life!

Bill Witthans

Old Glory figures after their "bath"

Old Glory figures after their “bath”