STEAM ROBOT CONVERSION
Page 1
 After seeing a picture of the Japanese
animation model steam detective robot on the Yahoo Gaslight discussion board, I
knew I just had to have one. I searched the Web and within a few days I
had captured one for my own. I planned to use it as a robot created by an
elusive inventor lost in deepest Africa and one of my upcoming Gaslight games.
After seeing a picture of the Japanese
animation model steam detective robot on the Yahoo Gaslight discussion board, I
knew I just had to have one. I searched the Web and within a few days I
had captured one for my own. I planned to use it as a robot created by an
elusive inventor lost in deepest Africa and one of my upcoming Gaslight games.
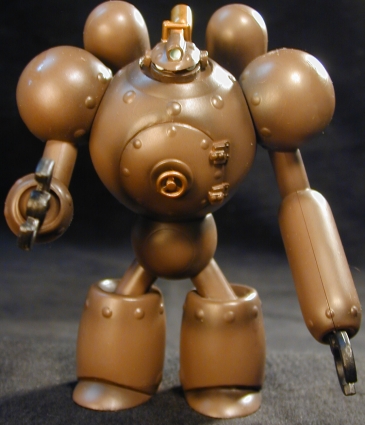
Upon
its arrival I noticed several things, first of it was a bit to modern for me everything was
very round and smoothed more a 1930s to 40s look. It did not have the feel of a truly Victorian era
robot. Besides that anybody knows me knows that I just can't leave well
enough alone. There were also several other problems, the first being that is
made out of two different mediums. One is a sort of tough foam like
substance, somewhat soft to the touch. I had a feeling it was one of those
materials that nothing would stick to. The other material was your typical
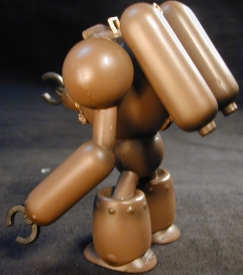
hard plastic such as a model is made out of. There were also mold lines and two
big rocket pods on his back that I decided to remove right away.
The model has several points of articulation,
the arms at the shoulders, the torso midsection, and the claws at the end of the
arms rotated. I started by disassembling the model and breaking off the
pods on its back. The pods left to quarter inch holes in the back of the
torso that I knew I would have to fill some how. I studied it for a little while
and then threw the whole thing in a bag on the workbench for a couple of weeks.
Several weeks later while cleaning off my
workbench I decided it was one too many projects waiting. I was in the
mood and decided to tackle this beast. While I liked the original color I
decided that I wanted an older look and that a black iron color would
help. I also wanted to add a lot of rivets and iron banding to give it an
older more Victorian look. In the interval between working on the project
and my original study of it when it arrived I had figured out a couple of good
methods to achieve this . I also had a concept of what it was to look like when I
finished. The first job was to fill the quarter inch holes left by the
pods removal on the back of the torso I used Squadron brand gas drying green
putty, a sort of Bondo for models. A little filing in sanding and they
were done. I then sanded and fixed all the mold lines and other
imperfections on the model.
Removing the large pods, extra riveting and
iron banding were to be the only modifications I decided to make do this
model. Glue and a custom-made punch would work for the rivets.
Placement for the banding and rivets was worked out and applied over the course
of about six hours.

