 From
the moment I first laid eyes on a game of Victorian Science Fiction (GASLIGHT) I
knew that I wanted Prussians as my main force and they would ride to battle
in a fabulous Airship!
From
the moment I first laid eyes on a game of Victorian Science Fiction (GASLIGHT) I
knew that I wanted Prussians as my main force and they would ride to battle
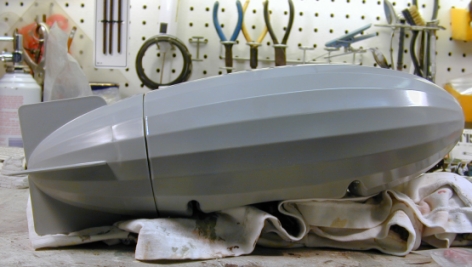
in a fabulous Airship!This is my current scratch built Airship Project.
From
the moment I first laid eyes on a game of Victorian Science Fiction (GASLIGHT) I
knew that I wanted Prussians as my main force and they would ride to battle
in a fabulous Airship!
My dreams however usually take quite a bit of doing to translate down to the wargame table! So for about a year I thought about and gathered pieces for my project. I thought about many different ways to construct the main fuselage none of them very satisfactory. I then made one of my occasional trips to Historicon the great historical gaming convention in Lancaster Pennsylvania were I noticed some interesting "Zeppelins" used in a 144 scale WWI air battle game. I was informed that the "Zeps" were in fact part of a Lego toy set. I thought that that would be great basis for my Prussian Airship and it would save a lot of construction time as well.
Boy! were they hard to find! but I finally located a couple (my son demanded one to play with) and one went to the workbench ready area.
While looking great the "Lego" airship comes with a lot of problems for the scratch builder or converter. There are for me 5 main issues and a host of others.
I had seen various methods over the years on supporting flying games pieces and had decided for me the main thing was to keep the ship from crashing down and having to be repaired all the time. I would have to go one of two ways multiple legs (hate it, looks buggy) or one tough, heavy, support!
I went for the heavy support 3/8s dowel rod down to a lead base like we used
for the old Mustangs and Messerschmitts flying game, in fact I used part of an
old set up from that game. I wanted it to be removable for storage so I built
into the body a receiving brass tube for the wooden dowel rod. This was a bit of
a project and where I learned that not much sticks to this plastic. 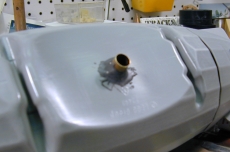
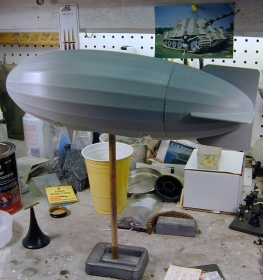 This
setup gave me a very balanced a stable platform that would defeat most wargame klutzes
and I felt I would be able to disguise it sufficiently later.
This
setup gave me a very balanced a stable platform that would defeat most wargame klutzes
and I felt I would be able to disguise it sufficiently later.
You can see that in this picture the entire surface was also sanded to help in getting paint and epoxy to stick. I looked at the model for several days as it was and then took a pad of paper with me while going out for breakfast one morning sketching and jotting down ideas as I worked my way though a stack of pancakes. Sketching out your ideas before hand has is a great way to see what works, what doesn't, and help develop your designs before putting all that work in on the actual project. I soon had a working drawing of where I wanted to go with my airship.