More mercenaries!

Quick little post to prove I’m still alive….. Lol! Been busy with life, work, and work, but still been managing to paint quite a bit, play a bit, and also working with Stevie G to reorganize and label our 15mm Napoleonic army’s!

So, here are some more of those Byzantine troops painted up to match Chris A’s SAGA war band. 4 Skutatoi Archers and 4 Spear men. Not my normal painting style but they needed to match. I think I’ve done this pretty well and even made them a bit better but not so much that it’s a noticeable difference. Chris gave me transfers for the shields (something I’m not a fan of using on my stuff) so I tried them, on the spear men they worked ok and match the original army perfect but the ones for the archers were too big and I had to hand paint those. Matched the basing, coated, and done, enjoy Chris!

Click to enlarge.

Hand made Steel Spears and applied transfer shield designs.

With theses I had to paint the shields, not to bad I think.

Next?

More figures for a friend…. well not the same friend! VARANGIAN GUARD

It seems that lately I have been doing more painting for others than I have ever done. I normally do not do commissions but it seems I’m starting to like doing it more for a couple of reasons, one it gives me a chance to paint thing I might not normally paint, periods, different conflicts, etc…. and I also fell better taking money earned from the hobby to buy more goodies for my hobby!

One of our group recently purchased a Byzantine SAGA war-band from another in our group and wanted to expand on the original forces. He asked me if I was interested because he wanted me to try to match the paint style of the original figures. Since I had considered painting one of my own Byzantine war-bands I thought this might be fun and a good way to really get a feel for the colors and style.

The first group: VARANGIANS

Custom SAGA Casualty Markers

A set of six should be plenty for a warband since 6 point armies are the norm and each unit is normally 1 point.

SAGA has been one of the games that has held my focus for the last few years and a lot of my painting and building has been centered around the game. I always like to make things better and improve if I can the look or play of the game. I never like game tables littered with markers, chits, or anything that takes away from the visual and SAGA is very good in this respect only requiring “fatigue markers” when a unit is tired out for one reason or another. I have seen all sorts of things used as fatigue markers, the original game produced markers in the form of shields, as well as coins, beads, small rocks, etc… Our group started long ago to use small plastic “Skull” beads as they looked cool. I think the first skulls where brought in by me after my buddy Stevie G bought me a pack at a convention. Another member of the group started making little vignette stands that used dice as part of the vignette to show the “fatigue” level. Rick Abbo then began to make some that used spear shafts in the vignette allowing the Skull bead to be slid on, they looked cool!

Well I finally got around to making my own and once again they are highly customized. This first set is based on wounded / dead figures that could be Vikings, Danes, Saxons, etc.….(sure they really work with any warband) I’ve added a hand cut steel rod for a spear to each one by drilling a hole in the figure to make them look wounded and hold the “skulls”. I have also added extra pieces from the “bits” box, real and “epoxy” rocks to give more life and character to the stands. If I can find the right wounded/dead figures, I plan to do this type of “Fatigue” stand for other factions as well.

The spear a just long enough to hold three fatigue marker skulls since the new SAGA 2 rules treat 3 fatigues as exhausted and excess fatigue is ignored. I like this since before you had to make the spears longer to get more markers on and looked not quite right.

This figure got a hand made arrow of piano wire and epoxy feathers to show a wound. The “steel” spear was also added giving the effect that he’s trying to stand and get to safety.

This is the same figure as the standing figure above but slightly re-sculpted to a lying down version. I sculpted some big rocks from two part epoxy in order to prop the figure up a bit and a better viewing angle.

A view of the additional sculpted rocks.

The fresh blood look is a TAMIYA color “clear red” over regular Vallejo red. It has to be applied after dull coating.

I put an ax in his hands to create that finial moment as a Viking dies when its so important to die in battle clutching a weapon to insure entry into Valhalla!

I love this one! I added some extra items, the shield with embedded ax to further the appearance of an on going desperate struggle!


Another project off the shelf!

Like I said in my last post I’ve been hard at work…ok well I’m making a real effort to clean out my shelf of partially done projects and I got to say that things are looking good! I have 3-4 projects finished and off the shelf and ready for a bit of a photo shoot when I get the time. This project here was number 4 to come off the shelf and just happened to get in for pictures ahead of the other projects. There is still a bit of work to do on the bases, stands, and maybe a bit more weathering, but I was so happy to get the project to this point that I couldn’t wait to get it up for all to see. Funny since it has been on the shelf for at least 5 years!

I have always loved the Starship Troopers mini’s and built an entire setup that I ran at conventions several times. I wanted to add to the ST universe on the Human side with additional forces to fight the bugs. The current force I used in the games for the humans were some Games Workshop Candian troops purchased off eBay fully painted. I bought them just to get the game going for the conventions. I had painted all the bugs but did not want to wait until I had painted all the Troopers to start playing. Now these “Mercenary” troopers were very well painted but me being me I wanted something different and painted by me. I thought about getting duplicate unpainted Candians, or stripping the paint off the current ones but wasn’t thrilled by either option. I then hit upon building a whole new force, different figures, not really military (tired of painting camo uniforms) but sort of “para military” and the idea for the “GALACTIC HIGHWAY PATROL” was born! A force that patrolled the Galaxy keeping the peace, restoring order, a force that would often find itself in unexpected and dangerous situations.

Your cruising along in your speeder on Rigeil 7, radio playing, your favorite green Orion slave girl at your side when you see this in the rear-view mirror!

I’ve collected a ton of minis for this force and this pair was the start of the project. I planned to paint them in an slightly updated style of the California Highway Patrol. A style I thought I could have fun with and would be very distinctive on the battlefield.

The decals were printed on a HP Laser printer using decal paper. The design being done with “vector” graphics instead of say a drawing program as bit map allows me to take and scale these up and down for any uniform or vehicle in the future without losing definition or sharpness! I scaled some down to make their uniform badges.

The minis were done so long ago that I can’t remember what I used other than I think the speeders were from some GW Eldar, the troopers are Candians out of a different GW flying gunship, and the Gatling cannon I picked up somewhere else. I remember I got to the point of painting them and was stuck on division of color for the vehicle and basic uniform color. I also was stuck on what to call them and how to paint all the insignia. I like to hand paint flags and such but in this scale on a more modern type project I knew that hand painting no matter how well it was done would not cut it! Finally, I bit the bullet and made my own “vector graphics” design and turned them into decals that could scaled to fit in several places.

All in all, I think it was worth the five years of contemplation!


I love the colors and the look of the California Highway Patrol now expanded into the future! The helmets came out just great!

I built a brass and steel pin system into the jet bikes frame so the under slung Gatling cannons can be swiveled around.

I’m thinking about ways to create some short clear windshields for them…..

Swedish Army (Figures for a Friend) part 2

Just a quick post to increase my sad flow of content here…lol! I do a lot more painting, building, and even playing than I post because posting is just not near as much fun or rewarding as “doing”! The last month though I have been making a real effort to catch up on projects that have been sitting on the shelf in various states of completion for one reason or another. I started by cleaning up the workbench and trying to make my painting process quicker without sacrificing the quality of work, since for me the building and painting are the most fun, playing is just an excuse to build and paint. Churning out mediocre troops in large numbers is not my thing. To do this I built a pretty cool painting accessory and changed my method of handling with the figures while painting slightly, more on that in a future article.

One of the first things to move to the finished pile was the last stage of the Swedish Army circa 1600 I had done as a commission for a friend. I had finished and delivered the main army last spring but the last part was the artillery section. Now my friend had pointed out that he had extra crew members for the piece and that one of them (the guy fusing the cannon balls) looked like he was making Swedish meatballs and could I possibly do a little vignette based on that. Well that itched my scratch building bones no end!

There was a lot of scratch building, the fire, frying pan, meat balls, spoon, mugs in the figures hands, “picnic cloth”, Rocks, bases, and trees. I’m not going to explain what I did as those of you who build will know and those of you who don’t wont care, I’ll simply present them and answer questions from your comments.

I did them as two bases, a sort of serious one and a fun one.

While one group mans the guns the other prepares the “Swedish Meatballs”

The “Assault Group” figures are very nice and a pleasure to paint.

Logs, fire, pan, spoon, and meatballs all made of two part kneadite epoxy.

This little vignette was just a hoot to work out and build!

The figure priming the guns is just a great sculpt and fits very well kneeling on the gun. Really makes the whole scene work!

Napoleonic Chasseurs a’ Cheval

Light Cavalry the “eyes and ears” of the army! (remember all pictures are “clickable” for a larger more detailed image!)

There is something about the Napoleonic period that has always fascinated me. I think it’s a bit like my fascination with feudal Japan the period of Sengoku-jidai  (The Age of the Country at War) where war was raised to almost an art form, truly “The Art of War”. Uniforms, dress, tactics, and weapons remained basically the same for a long period of time but were honed to a fine edge. I love painting miniatures, but both Feudal Japanese and Napoleonic figures hold a special joy in painting for me!

I recently decided to toss a paint brush and some time at reducing my 20+ pounds of unpainted 15mm Napoleonic figures as well as retire some ebay units to be replaced by units painted by me. Since much of my early gaming in the Napoleonic period was done using “mercenary units” standing in for Cavalry units I had not painted I figured that was a good place to start. Looking into the “Napy box” showed I could use some more light cavalry, in fact I had only one small unit of Chasseur’s a’ Cheval (and that was painted by my friend Stevie G over 25 years ago!).

I’ve always been a fan of “Old Glory’s” original line because of the cool poses! This officer looks to be saying something to the “Eagle” bearer, perhaps “Good luck Monsieur Barrett, once again we seek glory for France!”

Most of my Napoleonic figure are from 19th century miniatures (former Old Glory line) as I think they have not only one of the most extensive lines, but their variety of poses within the pack is outstanding. The sculpts are on the whole excellent, casting good, and in the hands of a good painter look very good as well (like most figures). I feel the figures  are much more dynamic as well, charging figures really look the part, even “at rest” or “in reserve”  figures look like they are getting ready to jump in the fight not the “trotting on the parade ground” pose you see in some figure lines.

I started with 24 figures, to be split into two groups of twelve, resulting in two six stand units based for the Age of Eagles rule set. The unit Steve had given me years ago was painted as the 13th Chasseurs and as an homage to him (he started me in Napoleonic’s) one-unit world be painted in the 13ths Chasseurs colors while the other would be modeled after the 4th Chasseurs a’ Cheval. Here are the 4th Chassaeur’s a’ Cheval. Stay tuned for the 13th Chasseurs soon to follow!

Napoleonic figures are I feel some of the hardest figures to get the uniforms correct simply because of the detail, complexity, and changes that went on over the period. The research can be frustrating and mistakes will be made even with exhaustive research by the best painters… I have made a few “simple ones” in these figures, can you spot them?

Horses are always tough to make look real. Over the years I think I have learned to do a fair job. Here we have the proverbial “Horse’s Ass!”

Lined up in “Attack Column” ready for the Emperors command! If you click and expand this picture the face of the horse in the back on the left is quite comical. He seems to have an expression of “good lord! not again…cant we all just get along!”

15mm Prussian Cavalry “Towarczys”

It seems that as of late I have been doing more painting but haven’t reduced my lead pile at all since I have continued to buy more for myself and all the painting was done for friends! Both enjoyable none the less!

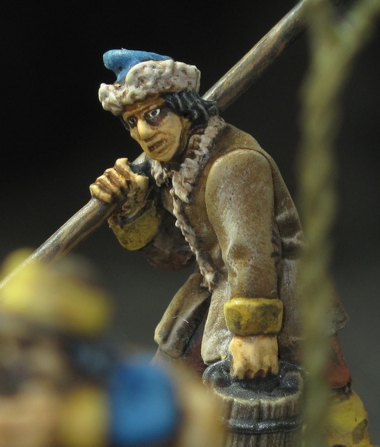
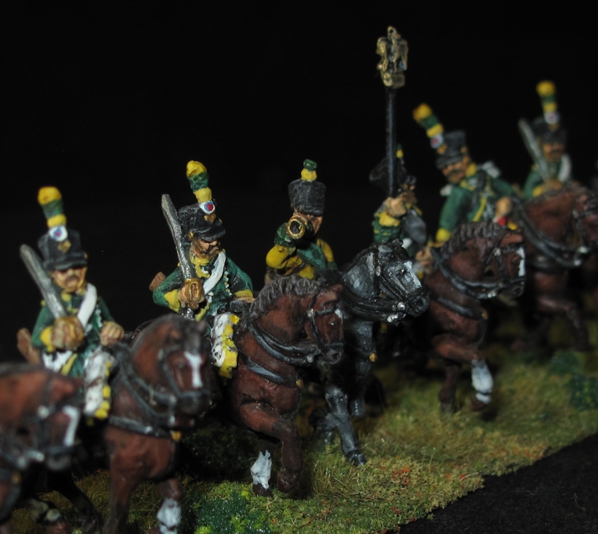
The current project was for my long time gaming buddy Stevie G and a couple of Napoleonic Cavalry units. Steve has a big Prussian force and recently picked up some Prussian “Towarczys” Lancers from Boki miniatures out in Estonia! They are some of those troops that are rare from a collector standpoint but look awesome on the battlefield.

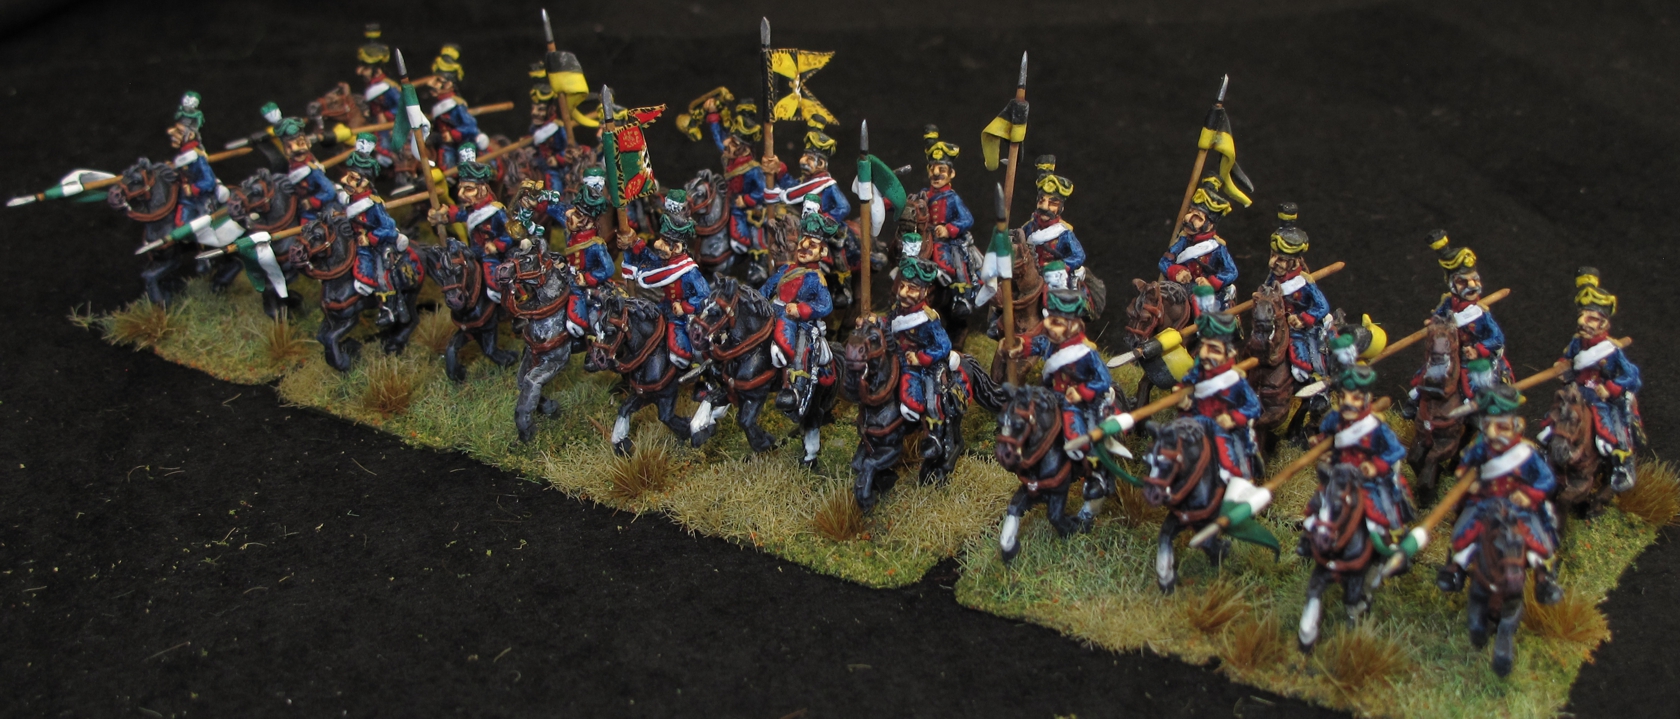
They are going to make a fearsome looking unit on the battlefield! Makes me wish I had Prussians so I could keep them for myself!

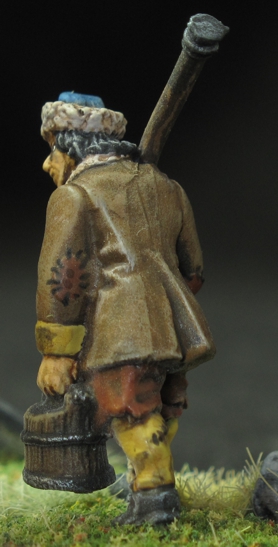
The minis are well sculpted with lots of details and are both fun and easy to paint. The casting is a bit off requiring some work in cutting out bubbles and filling some poor cast areas. I believe the problem is that these are gravity cast and not done with a spin cast machine. Its just a small chore and not really a big deal. The minis do not come with horses or lances. Horses from either AB miniatures or 19th Century Miniatures work well, I used horses from Old Glory 15’s (19th Century Miniatures) and though a bit less beefy than the 19th century horses on average I think they work well as eastern European horses tended to be smaller than their western European cousins.

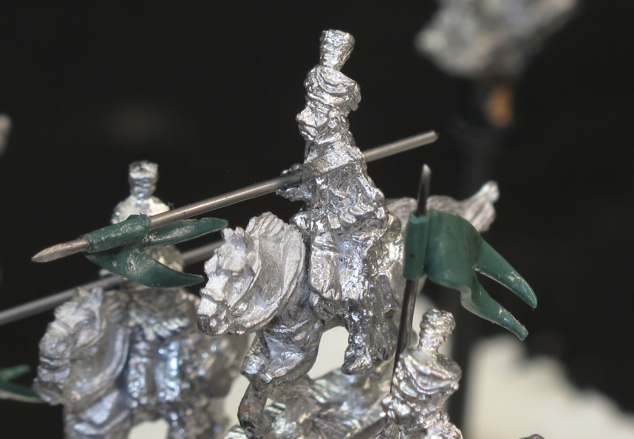
Next were the “lances”, they don’t come with any, not a problem for me as I replace ALL my flag poles, spears, and lances, on all my figures with STEEL! Over the years I have gotten pretty good at this and make some nice looking replacements. That how I got hooked into painting the figures by offering to make the lances and do the pennants for them as well.

Stevie G like I mentioned before is a long time gaming bud as well as the two of us being “grips” in the movie biz in Los Angeles. We have spent many a long day/night together on sets, Star Treks, Profiler, Charmed, and more, passing them time between shots talking miniatures (on Deep Space Nine we spent our lunch hours painting minis right on the set!) Steve has a heart of gold and has always jumped whole hog into any type of miniature wargaming that I dragged us into so the more I looked at the figures and worked on them the more I felt like going the whole way “prep to paint” with them. I felt it would be a great way to thank him for all the support and friendship over the years.

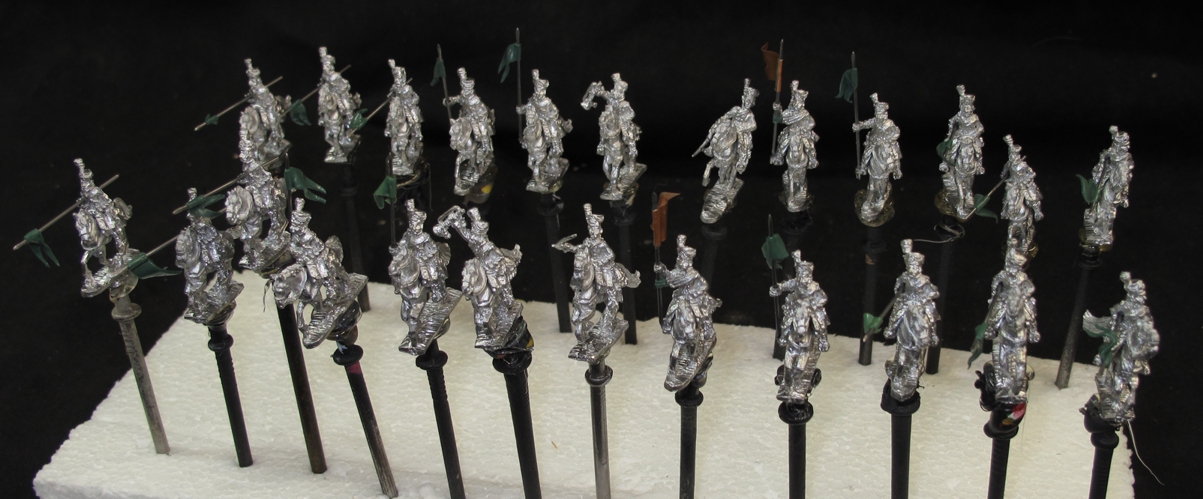
The first stage was cleaning and matching the horses and riders. I always carefully look at the riders pose and position, then select a horse that matches action wise. In other words don’t put a lance down charging figure on a horse that’s standing still! I also look at the figures and try to get as many varied poses in the unit and space repeated poses out to make them less obvious. Sometimes small mods can help with this, same rider different horses, bend a sword arm, cock a lance, and gently twist a head. Then since these riders and horses were from different manufactures I took time to cut and file both the back of the horse in the saddle area and the rider to get a good natural looking fit.

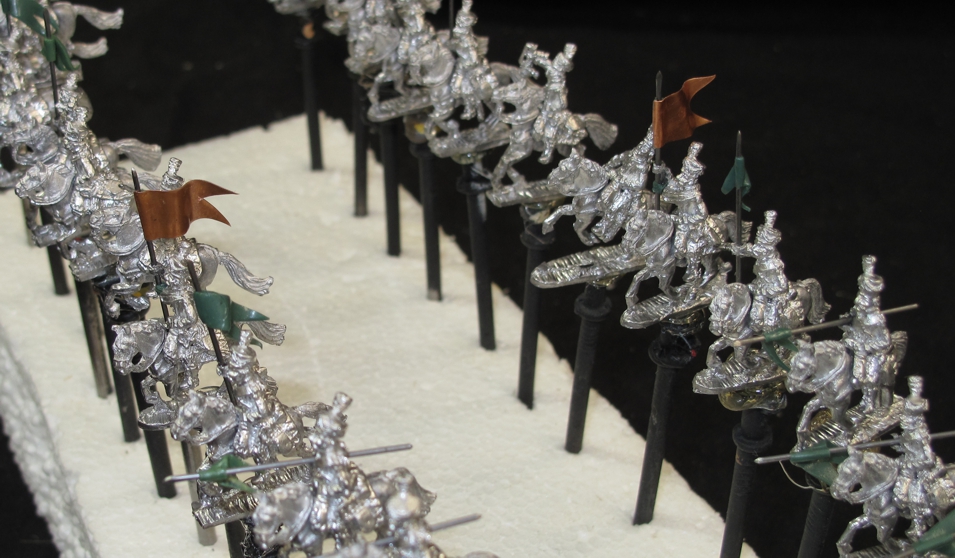
Hot gluing the figure to nails is something I started doing 30 years ago as an alternative to the common practice of gluing them to Popsicle sticks. A chunk of Styrofoam is used as a base…easy peazy!

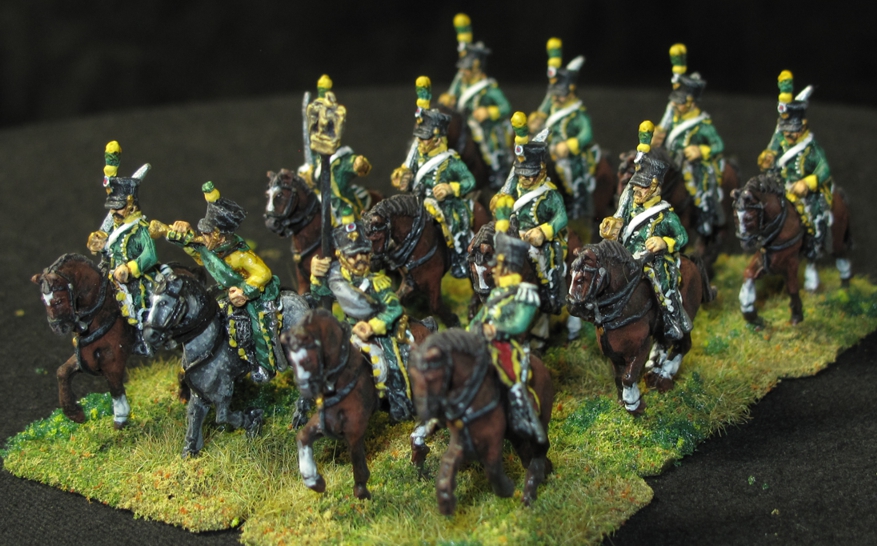
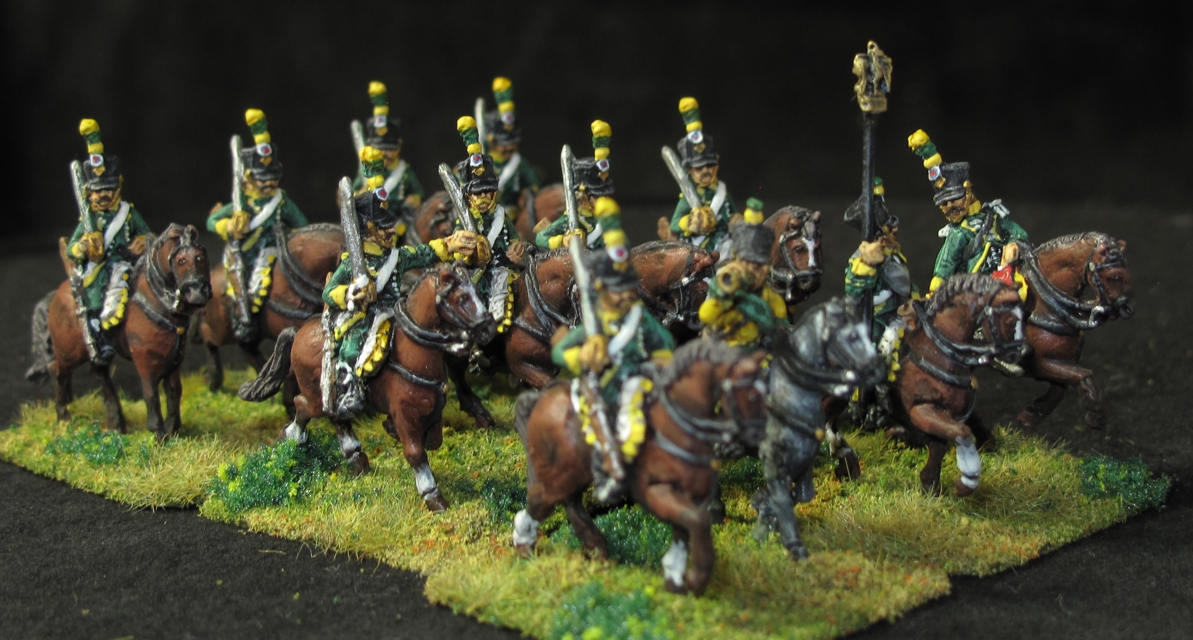
I always assemble the figures into the unit and determine each figures position in the unit before painting. This can help give the finished unit a more cohesive fee. I might have a figure that is pointing complimented by selecting a figure that has his head looking in that direction, have charging or running figures on the same stand, charging figures in the front, etc.…

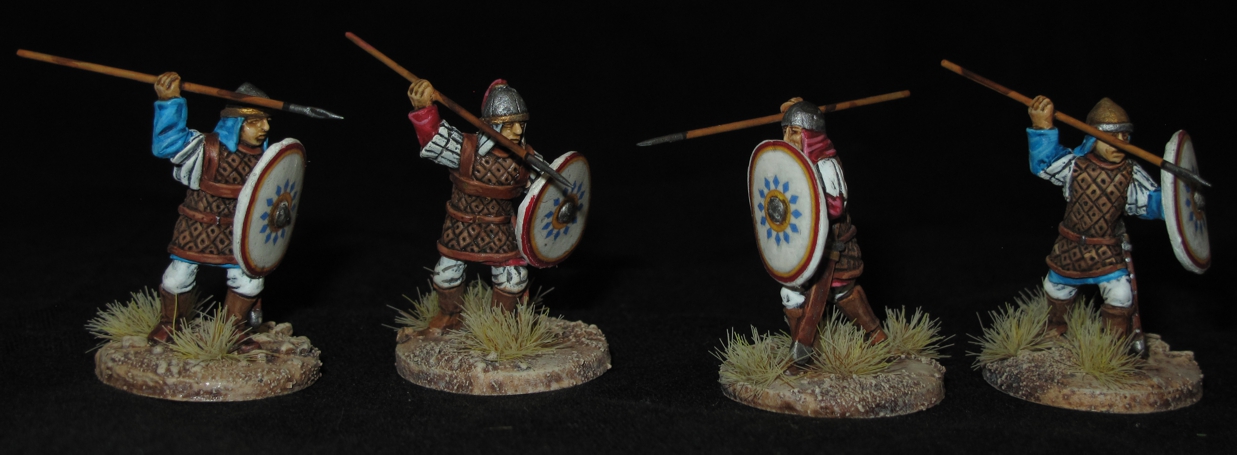
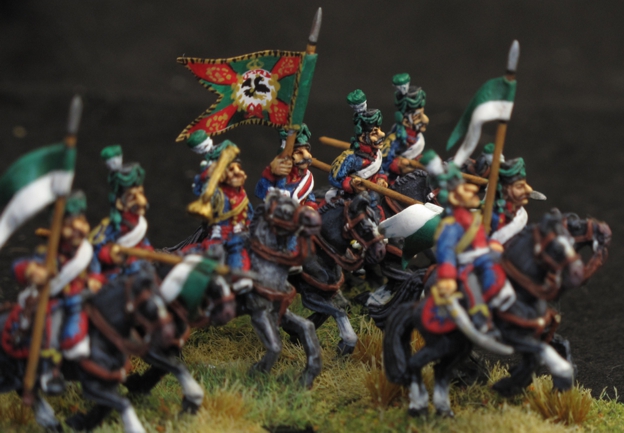
They were a lot of fun to paint and work on!

For a larger view just click on the picture!

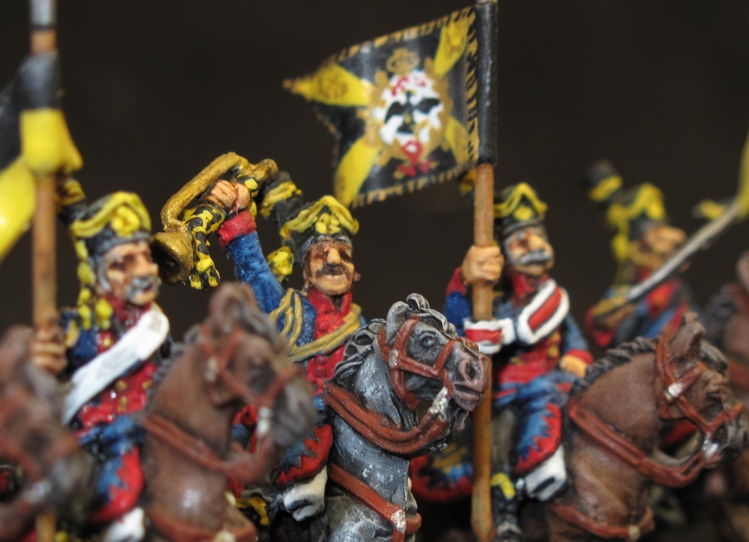
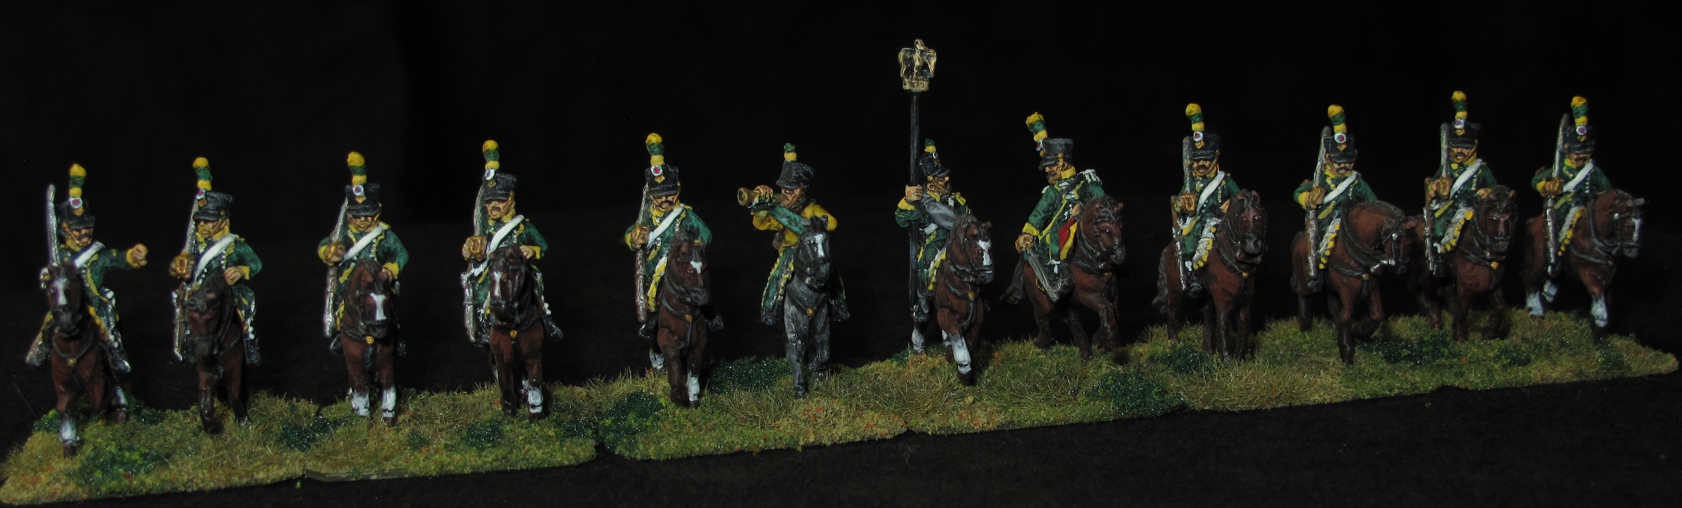
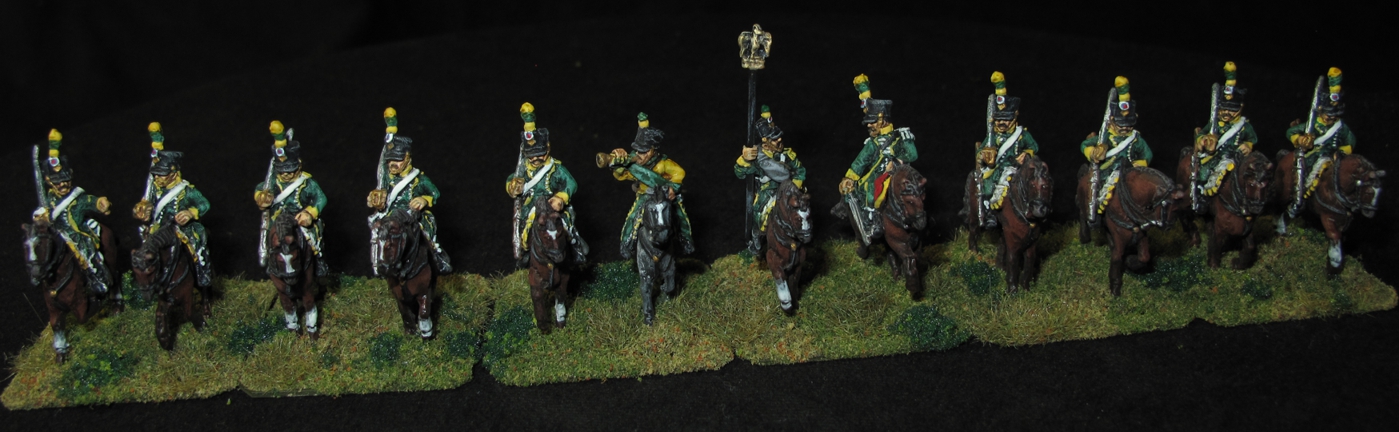
Flags are something I added and perhaps were not historically carried but they look good and heck this is wargaming!

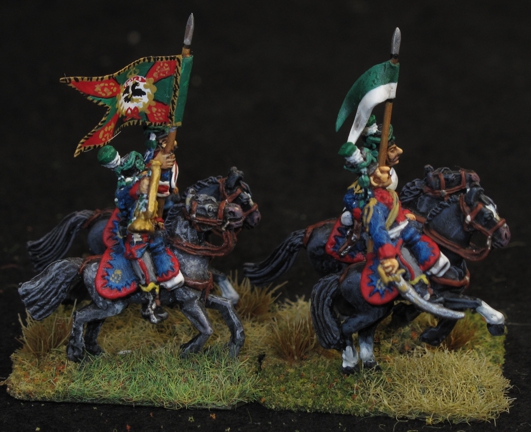
Unit colors were selected from text of one of Knotels prints from the excellent books by Elting on Napoleonic uniforms

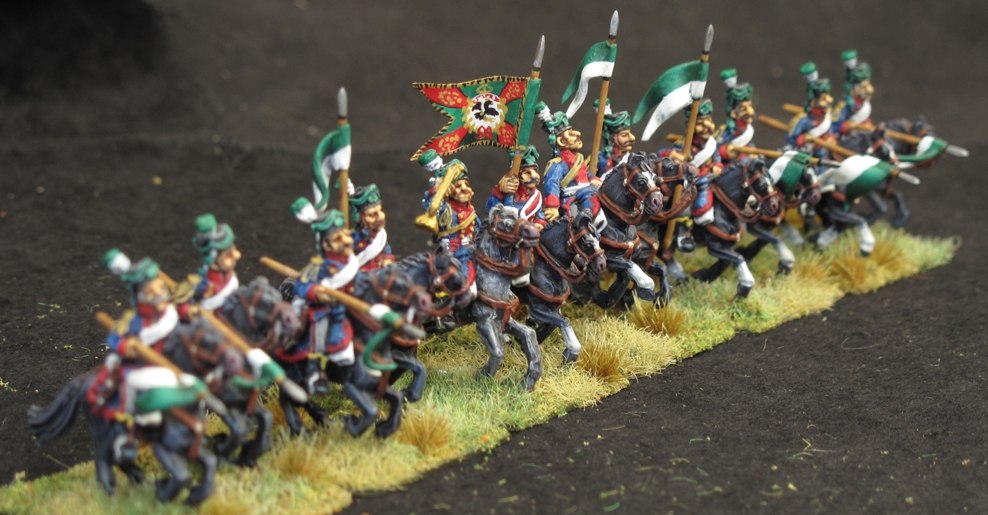
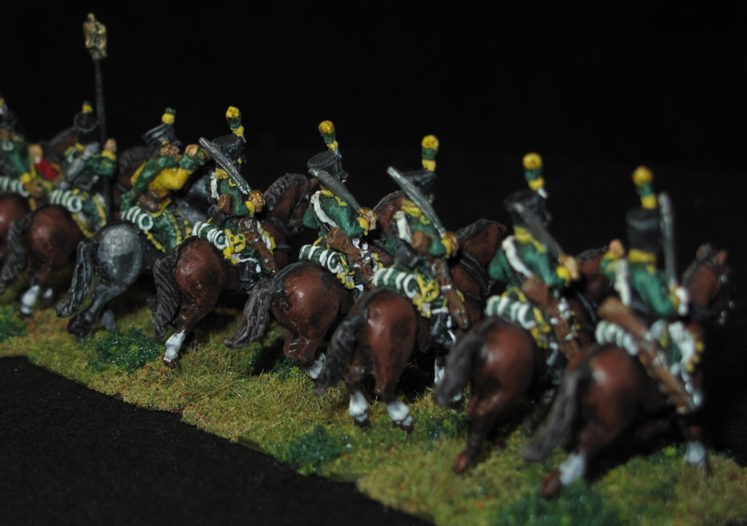
I’m really happy with the way the poses came out. I think the units have a very dynamic feel, truly looking like they are just laying down their lances to begin a charge!

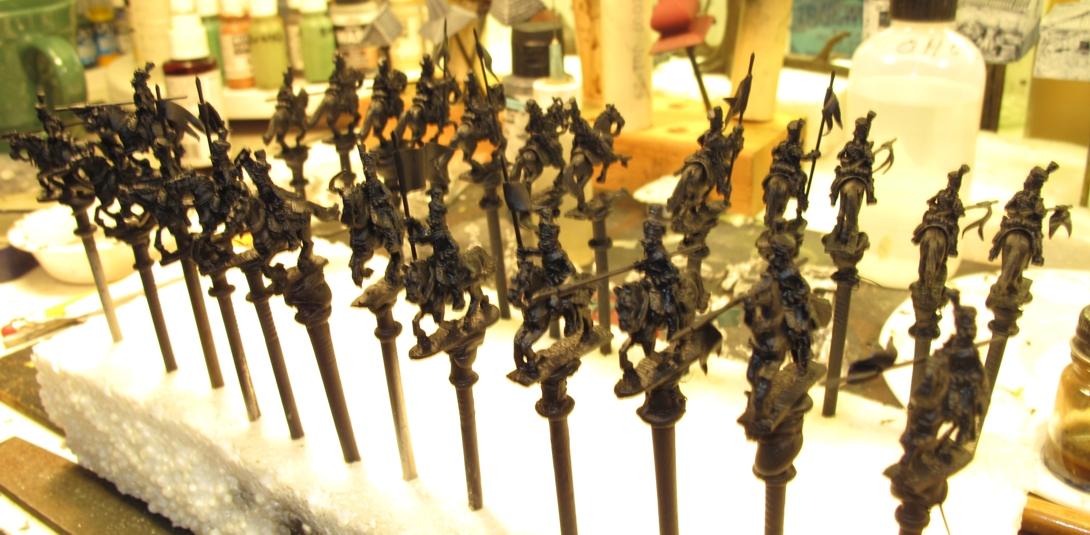
Black primed with Vallejo primer and ready for paint!